6 cute and creative DIY party decorations
Parties are about moments: the little encounters and big stories that make memories for everyone there. And hosting a party is all about setting the stage for those moments by creating spaces and vibes. That’s where our Hallmark stylists (and we’re guessing people like you) come in, with Crayola + Hallmark Color Pop party kits and unique, customizable DIY party decorations.
Here are half a dozen ideas for easy DIYs you can put together in a snap with Color Pop and a quick trip to your craft room (or closet or giant box of fun stuff).
Inspired? Create and share by tagging @HallmarkStores.
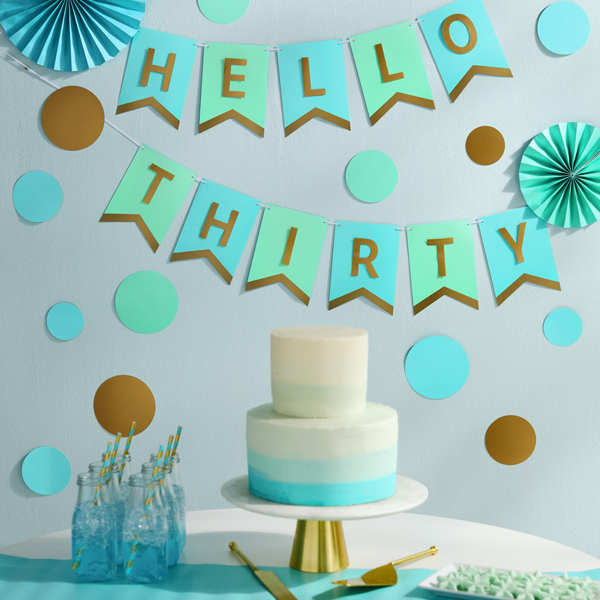
Custom Cake Banner
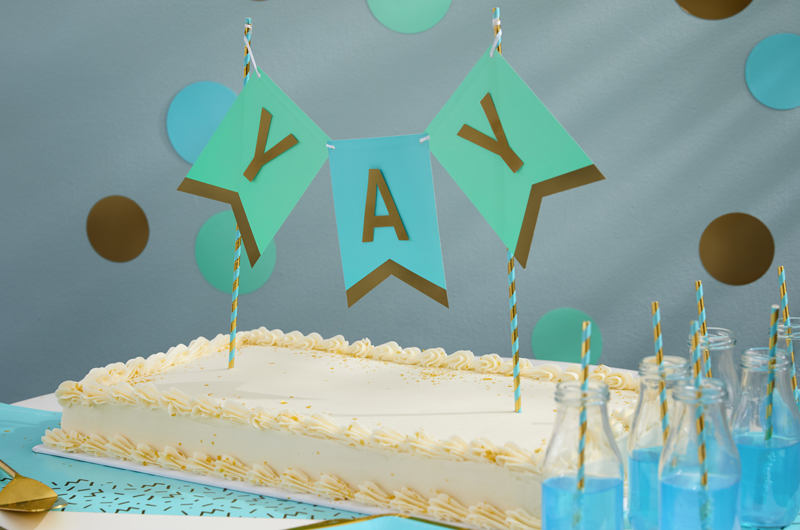
Celebrate a person, a feeling or an occasion on the centerpiece of all the best parties: the cake. We used Blue Color Pop kits for our cake topper, but you can use whatever colors fit your theme.
What you’ll need to make a cake topper:
- 4 paper straws from 1 Premium Kit (we used Aqua)
- Banner flags, stickers and twine from 1 Decor Kit (again, we used Aqua)
- Tape or hot glue gun
- Scissors
First, decide what your banner will say. Depending on the size of your cake, you might try a name, a mood (like “aww” for a baby shower) or an all-purpose, celebratory “YAY,” like we did.
To hold up the banner, make two “pillars” out of straws—tape two together end-to-end for each side. (Pinch the end of one to insert it in the other.)
Use the stickers to add your word to the banner flags.
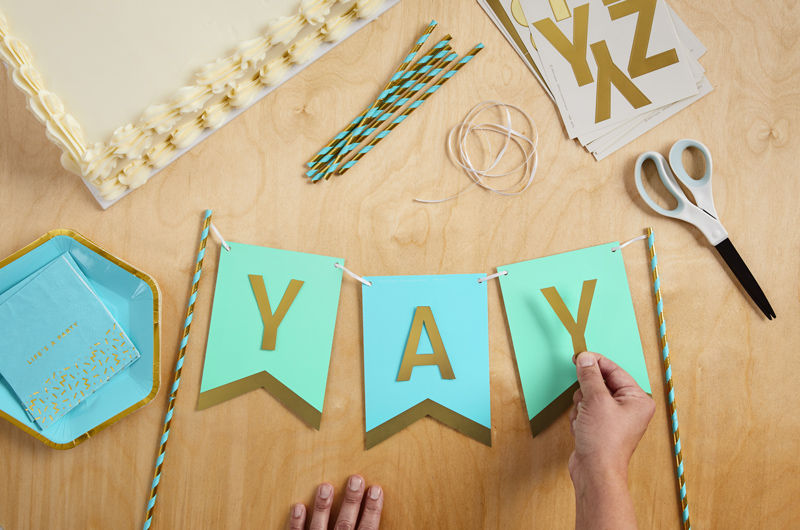
Cut a piece of twine long enough to hold your banner flags plus a few inches on either end and thread it through the holes in the flags.
Wrap one end a few times around the end of one straw pillar and secure it with tape or hot glue.
Repeat with the other end. (Don’t let your straws get grubby—you’re going to stick them in a cake!)
Poke the bottom end of each double-straw into opposite sides of the cake. Pro tip: Angle the straws out and put them in deep to keep the twine taut and the flags out of your frosting.
Whether you’re throwing a birthday party or a baby shower, this bright blue Color Pop Decor Kit is spot on. Get inspiration for a blue-themed bash here.
DIY Fruit Fans
Nothing says summer like biting into ripe, juicy watermelon or tropical fruit. It just takes a little imagination to transform paper fans into larger-than-life fruit slices.
What you’ll need to make paper fan fruit slices:
- 3 paper fans from the Pink Decor Kit and 3 from the Warm Ombre Decor Kit
- Card stock in different fruity colors (we used dark green, lime green, orange, black and white)
- Scissors or craft knife and cutting board
- Plates, cans or cups in different sizes for tracing circles (or be fancy and use a compass)
- Pencil
- Hot glue gun or craft glue
- Black marker
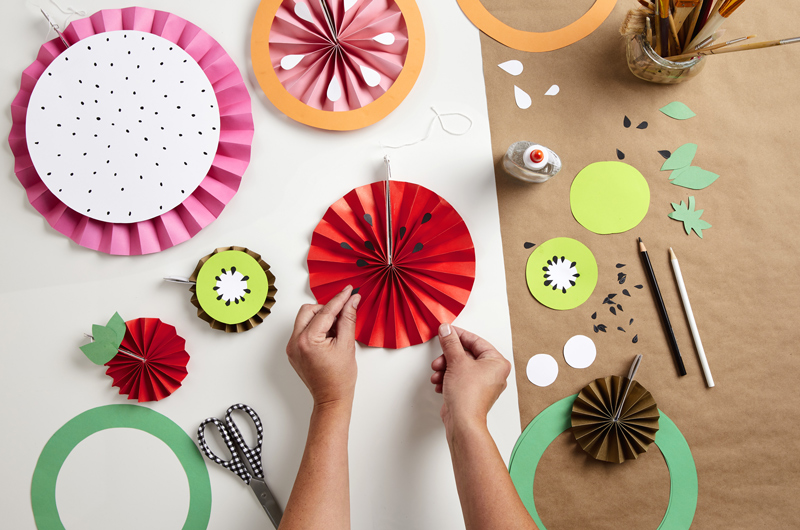
Watermelon:
- Cut a green circle a little bigger than the medium-size red fan; cut out the center to make a 1″ rind.
- Cut little watermelon seeds out of black card stock.
- Glue the rind and seeds to the fan.
Dragon fruit:
- Cut a white circle about an inch smaller than the large pink fan.
- Draw little seeds on the circle with the black marker.
- Center the white circle on a pink fan and glue it down.
Kiwi:
- Cut a lime-green circle a little smaller than a small gold fan.
- Cut a white circle about half the size of the green one.
- Center and glue the white circle on the green one.
- Cut teeny-tiny seeds from the black paper and glue them around the edge of the white circle. (You can also draw them on with the black marker.)
- Glue the inside of your kiwi to a small gold fan.
Grapefruit:
- Cut an orange circle a little bigger than the medium-size pink fan; cut out the center to make a 3/4″ rind.
- Cut grapefruit seeds out of white card stock.
- Glue the rind and seeds to a pink fan. (Or make a blood orange with a red fan.)
Strawberries:
- Cut a stem or leaves from green card stock.
- Glue to the top of a small red fan.
Mixing and matching kits is the really fun part of Color Pop. We love keeping a variety on hand to make pulling a party together easy any time.
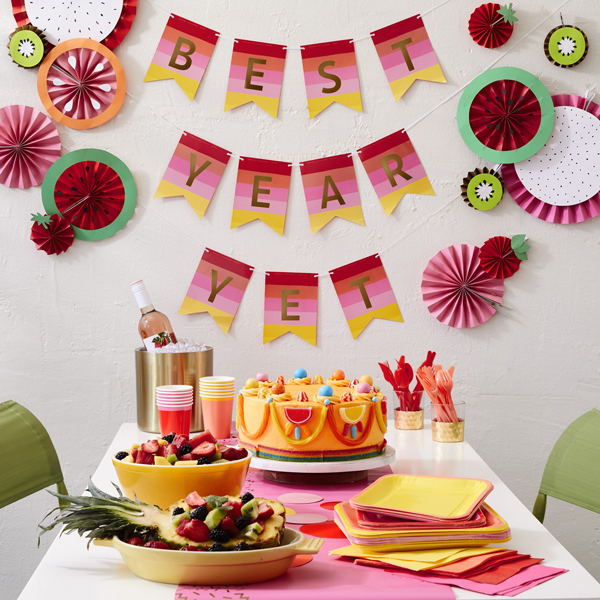
Splashy Photo Backdrop

Make a splash with paper confetti streamers. We used cool blues for our mermaid/pool/beach themed backdrop, but you can pull this look off with any mix of colors. Think about using school colors for graduation, matching nursery palettes or wedding colors for showers, making a rainbow for a Pride Parade after-party or using silver and gold for milestone anniversary parties.
What you’ll need to make a confetti streamer photo backdrop:
- Decor Kits: 1 each in Aqua and Cool Ombre
- White or silver curling ribbon (or dental floss or fishing line)
- Glue gun, craft glue or clear tape
- Poster or painter’s tape (for hanging)
- Optional: 3′-4′ dowel or curtain rod
- Optional background: Silver or iridescent streamer backdrop (or fringe curtain) OR shimmery wrapping paper, like this or this OR mix of shimmery ribbons in watery colors (blues, greens, silver, iridescent)
Make the banner.
First, decide what you want the banner to say. Some suggestions for a cool blue water-adjacent party:
- GO WITH THE FLOW
- MAKE WAVES
- COOLEST DAY EVER
Attach letter stickers to the banner flags in your Decor Kits (we love to mix and match).
Lay out the banner flags to figure out how many rows you want.
Cut a piece of twine for each row of flags—leave at least 6 inches on either side for hanging.
Thread the flags on the twine.
Pro tip: Your photo backdrop doesn’t have to go all the way up to the ceiling and down to the floor for it to feel like an immersive experience. Imagine a few average-height guests standing in front of it, and plan to take pictures from the waist up. Make your backdrop high enough that you can read the words on the banner and wide enough to hide the walls on both sides.

Make the confetti streamers.
Decide how tall and wide you want your backdrop to be. Cut the curling ribbon to that height plus a few inches for hanging, and cut enough pieces for one every 6″ or so across the whole width.
Lay the ribbon out on a flat surface the way it’s going to hang on the wall. (If you’re using a dowel or curtain rod, you can tie one end to that.)
Gather up the oversize confetti pieces from your Decor Kits and lay them out on the ribbons. Play around until you’ve got them spaced and placed the way you like, then glue or tape the confetti to the ribbon. Mix and match colors and sizes to look like bubbles, or alternate rows of different colors and sizes.
Put everything together.
Start with the background, if you have one: If it’s a streamer curtain or wrapping paper, just use the tape to attach it to the wall. If you’re using ribbon, cut it in a variety of lengths and tape the tops to the wall.
Next, layer on the confetti streamers, either by hanging the rod or taping the tops to the wall.
Then comes the banner—tape the ends of the twine to the wall.
Add the finishing touches by taping the fans to the wall on each side of the backdrop, as shown. (They’re handy for covering where you hung the banner.)
Backdrops aren’t just for DIY photo booths (gasp). Other ways to use them:
• Hang behind the gift or buffet table to create a focal point for the party.
• Decorate a front door.
• Put one behind a special chair for a visual spotlight on the bride, mother-to-be or other guest of honor.
Place Card Ice Breakers

Whether your guest list is filled with friends who go way back or best friends who just haven’t met each other yet, this is a fun and easy DIY that will get them talking (and laughing).
What you’ll need to make place cards:
- Place cards from the Pink Heart Premium Kit
- Pens/markers
Are your place cards folded? You’re halfway there.
Next, come up with your superlatives (Remember high school? “Most likely to…” “Best at…” and other compliments) or friends’ roles in the group. (The compliment part is very important.) Some tips:
- Think about your group of friends and what you love them for.
- Get out an old yearbook for inspiration.
- Go with the theme. For Galentine’s Day, they might be about love and friendship.
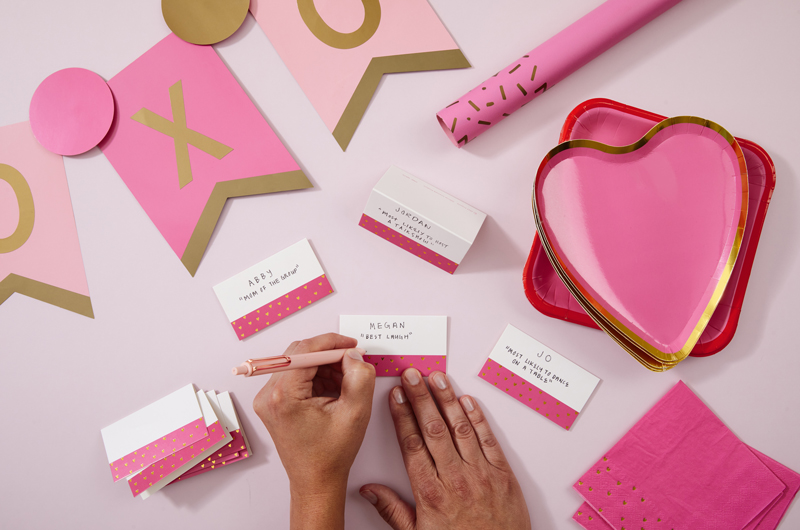
Here are a few of our favorites to get you started:
Superlatives
- Most Likely to Get Famous
- Most Stylish
- Most Likely to Run for President
- Class Clown
- Most Helpful
Group roles
- Loudest Laugh
- The Peacekeeper
- Group Mom
- Party-Starter
- Storyteller
- Cat Lady or Dog Mom
Write one on each card with a blank line underneath and put them at each seat (or on the serving table).
When guests arrive, invite them to take a seat or grab a card and add their name. (They can also get their bossy on and match friends with cards.)
Once everyone is together, ask each guest to share the card they picked and why.
From decorating to theme ideas, get more inspiration for a Galentine’s gathering right here.
Festive Plating Skills
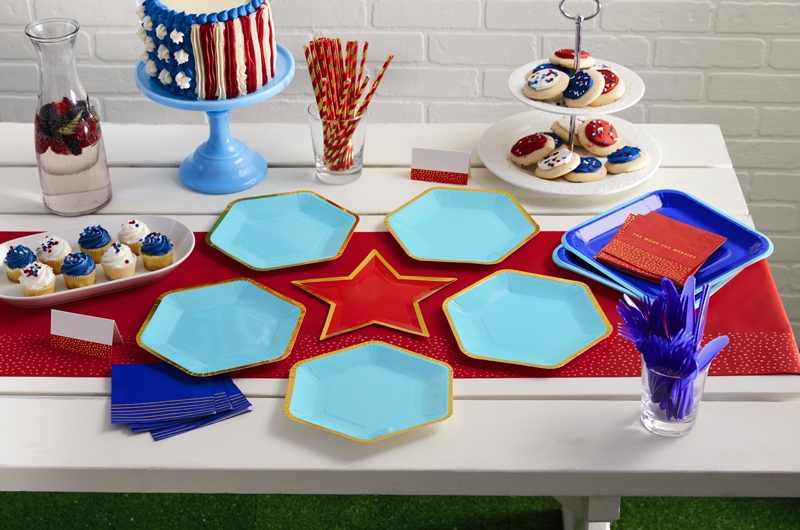
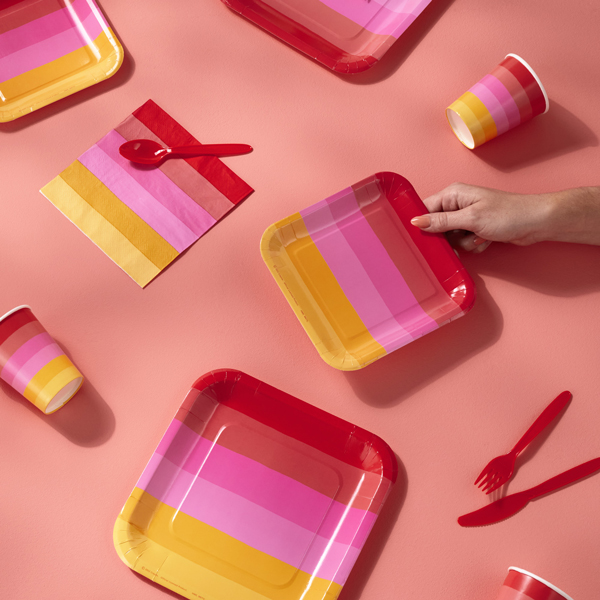
Sometimes all the inspiration you need is fun shapes and colors. Arranging these hexagonal plates with a star in the center is perfect for crudités and dip, cheese and crackers, ice-cream add-ons, DIY bruschetta or cocktail garnishes. This teal and red combo feels right for a patriotic celebration or a superhero theme party.
What you’ll need to make this serving arrangement:
- Premium Kits: 1 Aqua Hexagon and 1 Red Star
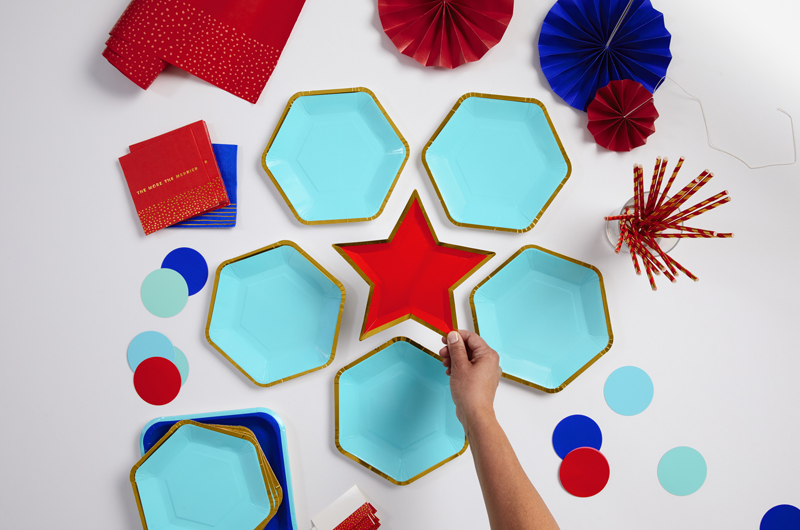
So easy: Center the star. Tuck the hexagons in the corner. If you want it to stay in place, double-stick-tape it to the runner.
Single-serve “Charcuperie”
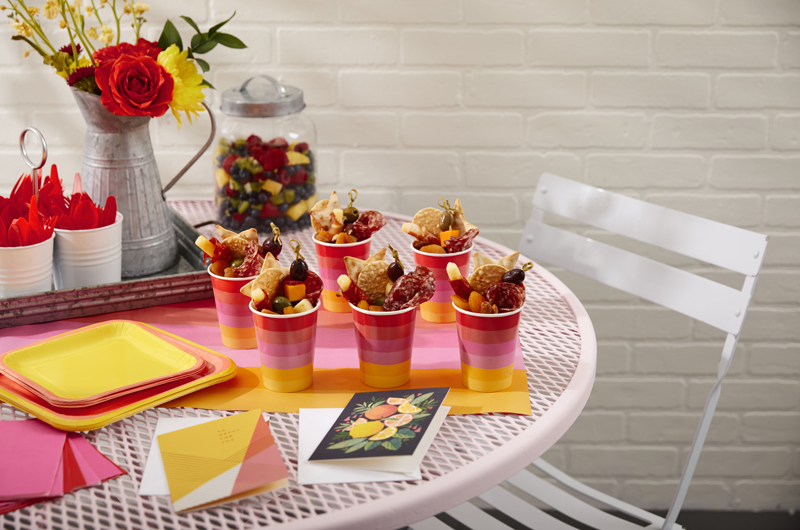
That’s charcuterie in a cup. And it’s the perfect way to serve a delicious selection of meats, cheese and other yummies at a family picnic, grown-up happy hour or sticky kids’ party. Bonuses: You can make it ahead and they don’t have to share.
What you’ll need to make charcuperie:
- Cups from any Color Pop Basic Kit
- Bamboo skewers
Snacks:
- Cheese cubes and olives or berries, grapes for skewering (also try dried fruit, cherry tomatoes, sliced or ribboned veggies)
- Long, thin crackers and/or breadsticks
- Cured meat, rolled in cones or tubes
- Nuts
- Pieces of fancy chocolate
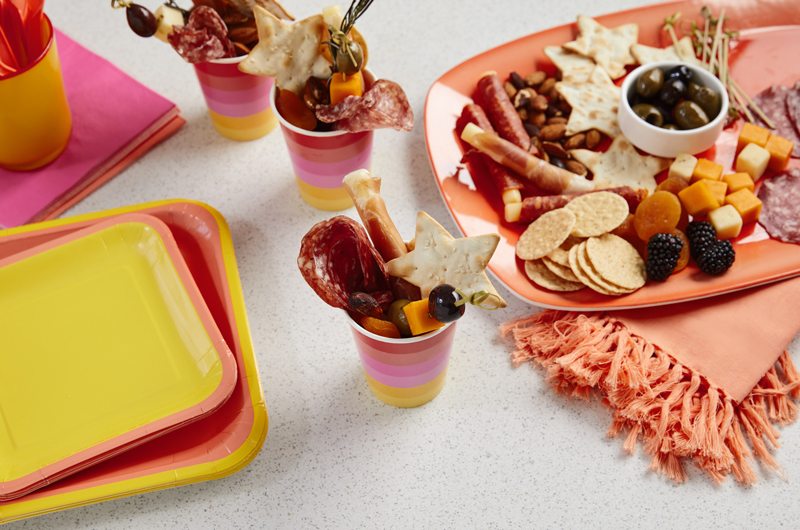
Play with the shapes and sizes of your snacks as you fill the cup. Most important goals: Make the portions generous and good-looking. Pro tip: Figure out how to fill one cup, then fill the others assembly-line style.
- Start by building a skewer for each guest.
- Add a skewer and a cracker and/or breadstick to each cup.
- Fill in the bottom with nuts.
- Tuck in the rolled-up meat.
- Top with a piece of chocolate (or put it in the bottom as a mini dessert)
Make charcuperie up to 24 hours in advance, cover and refrigerate—then take them on a picnic. Find decorating ideas for your perfect picnic here.
Adding your personal touches to any party is a big part of making your guests feel seen and loved. And that’s better than any party favor you can give.
Planning to try any of these DIYs for your next event? Share the finished product with us on social by tagging us at @HallmarkStores.
Shop Color Pop
See allYou may also like
See more-

Parties & Entertaining Make these delightful DIY personalized place card holders to elevate your party table
If you’re the sort of person to throw a dinner party, chances are you’re all about the details. And if you’re all abo...
-
Parties & Entertaining Photo-worthy holiday tablescapes: 40+ Christmas, Hanukkah and New Year’s Eve table decoration ideas
I’ve always loved interior design. This has resulted in hours of gazing at stylish tablescapes, reveling in the color...
-
Parties & Entertaining Let’s get together: 11 party ideas for adults
I believe that the little moments are what really make life special. Don’t get me wrong—I love celebrating the “big” ...
-
Parties & Entertaining From parallel parking to prom: Celebrating your teen’s big moments
For the parent of a teen, no moment is too small to celebrate. There’s just so much during these years to get excited...
-
Parties & Entertaining Worth the wait: Milestone party ideas for life’s biggest moments
I’m the kind of person who just can’t let big moments pass by without some sort of celebration. I like to live like e...
-
Parties & Entertaining Kick off your favorite season with a cozy fall drink bar
If the title of this article snagged you, we’re guessing it’s because you’re a fall weather fanatic. And because you ...
-
Parties & Entertaining Our 3 best party decoration ideas to make entertaining easy
If you love hosting friends and family in your home, you'll take any excuse to get together—from big birthdays to bab...
-
Parties & Entertaining 10 colorful, trendy party decorations and themes
As the designated party-planner in your friend group, you know every gathering you host is a special occasion. You al...