8 tips on how to take great photos with your iPhone

Photos have been a huge part of capturing memories ever since cameras were invented. And these days, with advanced cameras hanging out of the pockets of our jeans by way of an iPhone, it’s easier than ever to get great photos.
But for many people, no matter how hard they try, those gorgeous, Insta-worthy photos just never seem to turn out. To help you out, we’ve put together our best tips for how to get great photos with your iPhone. Because whether it’s your dog, your fancy dinner, your dog (again) or your kids doing something cute, you deserve photos that capture the joy these things bring.
Inspired? Create and share by tagging @HallmarkStores.
Tip #1: Be Inspired by What an iPhone Camera Can Do
There’s a sea of great photos on social media that were shot on iPhones. Whether you’re a beginner or a pro, we often find inspiration by observing great works by others. If others can do it with an iPhone, most likely, so can you.
Study their work and learn to recognize what makes certain photos better than others. Then, try to emulate them by finding the best angle or the best time of day to take the photo.
Try this:
A good way to study the lighting of an image is by observing the shadow in the photo. Shadow is always on the opposite side of the light position. The longer the shadow, the lower the light source is. If the shadow is soft, that means the light source is diffused, like on an overcast day.
Try taking photos of the same subject on different days and times and from different angles. On sunny days, try taking some photos with the light at your back, in front of you and coming in from the side. Consider these questions as you experiment:
- What sort of effects does your approach have on the shadows in your photo?
- Do you have a favorite time of day to take photos?
- What time of day do you think another photographer’s photo was taken?
Pro tip: Use hashtags to lead you to potential areas of interest. For instance, when traveling, hashtags are a handy way to find hot spots for photos before arriving at your destination.

Tip #2: Treat Your Phone Like a Camera
The iPhone camera has come a long way since it was first launched in 2007. Back then, it was just a lowly 2-megapixel camera. No wonder most people didn’t take the iPhone camera seriously. In fact, many still don’t consider it a “real” camera, even though iPhone photography technology has advanced by leaps and bounds in terms of both hardware and software after more than a decade.
Try changing your mindset when you’re taking pictures with your iPhone. Treating your phone camera as a legit camera will naturally change the outcome of your photography!
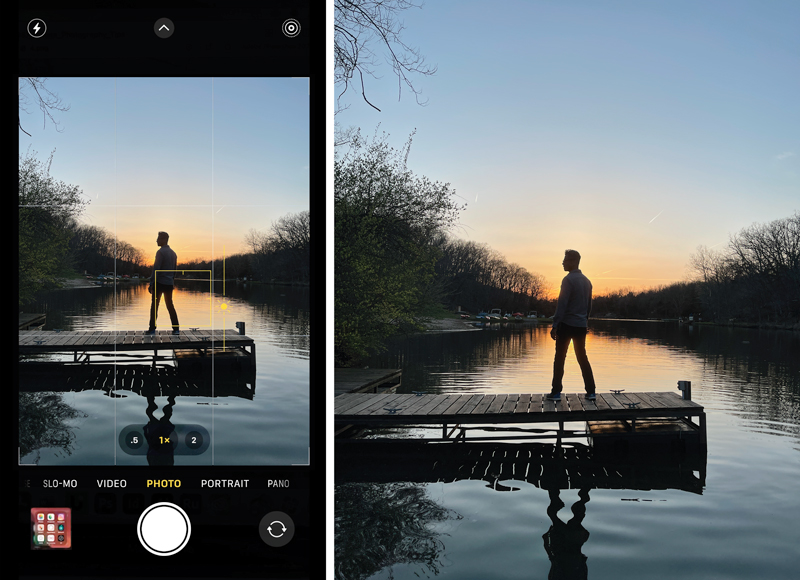
Tip #3: Know Thy iPhone Camera
You already know that your smartphone is a mighty powerful tool that fits in your pocket, but you should spend some time exploring the various functions and features of the camera app itself. You can find lots of tutorials with just a simple internet search.
You’ll need to play around and figure out how to use these features through hands-on experience. It’s just like any other tool—once you possess the basic knowledge to operate it, you can use it to create something great.
On the flip side, it helps to know its limitations. Even though iPhone photography has advanced a considerable amount, there’s only so much this little camera can do. Keep this in mind when taking pictures with your iPhone camera to avoid feeling disappointed in your photos later.
For example, the iPhone camera can do a lot, but picture quality still suffers in many low-light situations. Therefore, make sure you’re working with enough light.
Try this:
If you intend to take a silhouette or a dark and moody image in a darker setting, make sure you override the auto exposure (brightening) feature. Give this exercise a try:
Set up a subject (a person or an object) in a dim environment—like a living room in the evening—and play around with the brightness of your photos. Just tap on the screen while in the camera app to activate the auto exposure feature (a sun or brightness icon will appear), then slide your finger up and down to increase or decrease the brightness of the photo you’re about to take.

Tip #4: Learn the Photography Basics
If you treat your iPhone camera like a real camera, that means you also need to know the basics of photography. There are three main principles when it comes to photography—light, composition and subject.
Light
Due the small size of the camera’s sensor, light is your best friend when taking photos with an iPhone. And if there’s light, there’s shadow. The juxtaposition of the two gives you contrast and definition that make certain parts of your photo really pop and allows other parts to fade into the background.
Exposure is the amount of light that reaches your camera’s sensor. Your camera app has an auto exposure feature, but it also allows you to change it manually. Play around with the exposure level for different photos—you may find your manual setting gives you a better product than what your phone’s auto setting would!
Try this:
Food typically looks better with diffused light source slightly from behind or the side. (Avoid using the flash.) Try some food photography yourself by going out to breakfast or lunch and getting a seat close to a window. Take photos of your food or the barista’s latte art!
Composition
Essentially, this is what you include in your photo—and what you choose include or exclude can make a big difference. Pay attention to what you include in the frame. Simply taking a step forward, crossing the street to get a wider shot or changing the placement of the key subject in the frame can all affect a photo’s storytelling and aesthetic.
If you’re unsure, capture images from various vantage points and choose the one you like best. The world can be much more refreshing when seen beyond eye level.
Try this:
When in doubt, the rule of thirds is an easy guide to achieve a more visually pleasing composition. Turn on your grid in your settings app by scrolling down to camera, selecting it and then toggling the grid switch under “composition.” You can use the grid as a guide to align your subject or focal point in the left third, right third, top third or bottom third of the frame.
Pro tip: Try a few test shots and review the images. That will give you the opportunity to see if you need to compose your shots differently.
Subject
This is what you’re capturing in your photo. The subject can be a person, or a pet or a flower—or a building, landscape or the sky. Being aware of your subject allows you to pay more attention to the light on it and where you choose to place it within the frame (composition). They are always interconnected.
Try this:
The portrait mode feature detects the face of a person and blurs out the background to simulate the look on photos taken with an SLR or DSLR camera, known as a shallow depth of field. It is great for portraiture because it helps to separate your subject from the background.
You can use it for more than portraits of people, though. Try this feature when taking photos of your pets, flowers or even food!

Tip #5: Learn To See Everything Differently
Once you know the basics of photography and start using them to take photos, you will begin to see the world differently and become more aware of great moments worth capturing.
For instance, you might notice a subject in the right light and start to compose a picture in your mind with a frame around it. Before you know it, your iPhone will already be in your hands and you’ll be clicking away.
Try this:
We don’t always end up at the right place at the right time for a great photo, especially if you’re indoors. Look around and find the light. One of the best locations for portraits is in a doorway, where there’s no direct sunlight hitting on the face of the subject. The frame of the door also allows the person to naturally interact with their surroundings. You should try it. It’s quite magical.
You could also try taking your kids to the park during golden hour—the last hour before sunset—when the light adds a golden glow to just about any subject. You’re essentially bringing your subject to the light!
Pro tip: There are a million photography tutorials available on the internet, but you’ll be best served by one that suits your level. And keep in mind that even if they are meant for all types of cameras, the basic principles still apply to iPhone photography.
Tip #6: Take Lots of Pictures
As long as you have the space on your phone, it doesn’t cost anything to just take lots of pictures. It’s not like you’re not developing any film here, and practice makes perfect—so snap away!
Besides, based on the rule of probability, the chance of you getting a great shot is much higher if you snap multiple shots of the same subject. And more exposures give you more options. Plus, there’s always that one person with their eyes closed.
Pro tip: Don’t worry too much about getting perfectly composed photos. You might miss a perfect moment while taking too long trying to adjust your shot. In many cases, a not-so-perfect composition can be cropped and rotated to perfection after the photo is taken.
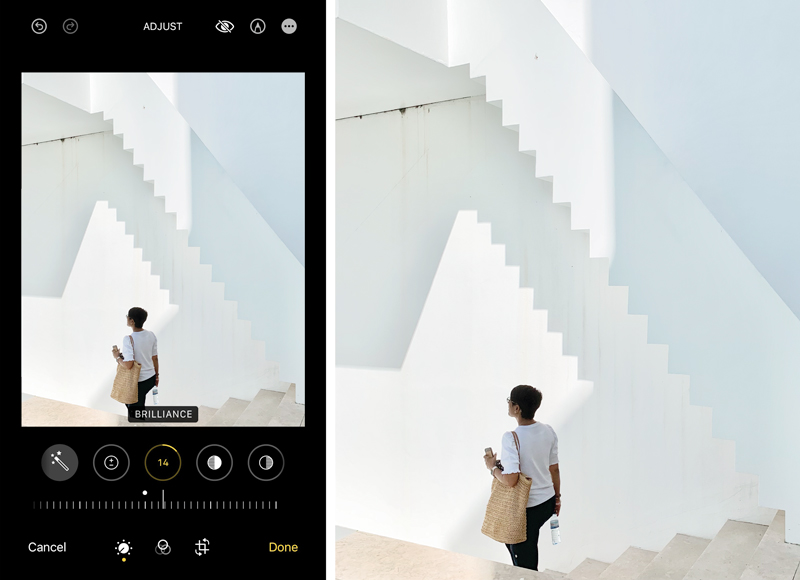
Tip #7: Always Edit Your Pictures
It’s rare that a great photo is unedited and straight out of the camera. Even analog photos shot on film—which predates the digital era—were edited during the darkroom process using various methods.
It’s worth trying to edit your picture even if you think the picture is already good. You can always undo the changes later if you don’t like them. You’ll be surprised how a simple shadow lift or a subtle vignette can make a big difference.
Try this:
It can be daunting to edit your photos if you’re not familiar with the tools. Here are the three tools you can access from each of your photos after tapping the edit button:
- The brilliance slider – The icon for this tool looks like a yin-yang symbol. Slide it left and right to see if it improves your picture quality.
- The shadow slider – This tool is especially great for an underexposed (darker) image.
- The brightness slider – This tool is perfect for adding further brightness if needed.
Try not to overexpose your picture. If anything, you should rather slightly underexpose an image because there’s information in the darker area that you can bring out the details during the editing process. It’s harder to salvage details from a blown-out (aka overexposed) picture.
Pro tip: The editing functions within the native camera app are pretty powerful, so that’s a great place to start. However, there are also many photo editing apps that you can try, such as Snapseed (which is free) or Lightroom, if you’d like to try something a little more advanced.
Tip #8: Print Your Pictures
If you put a bunch of effort into taking great photos with your iPhone but have only an endless stream of digital photos on your tiny phone screen to show for it, what’s the point? We still live in a very tactile world, and it’s nice to have an analog experience once in a while.
Enlarge and print out your favorite photos to display at home or give as gifts. Better yet, use services like Hallmark Photo Cards to create beautiful greeting cards to send to friends and family and show off your beautiful work!
Places to put your iPhone photography skills to good use
We love going with the flow, but if you’re not sure when or where to practice (or show off!) your iPhone photography skills, we’ve got some thought starters. These days, everyone has a phone in their hand, so it’s unlikely you’ll be bothering anyone. Just consider asking before taking pictures of strangers or their kids to be considerate of their privacy.
Any of these events or places are great for either practicing your iPhone photography or capturing great photos:
- Wedding receptions
- New baby homecomings
- Graduation
- Random hangs with friends or family
- Nature walks
- Birthday gatherings
- Anywhere there’s a cute dog
- In doorways (great shadow play)
- Travel scenes with pops of color, interesting signage, cool architecture or pretty flowers
- Beaches—lots of textures, perspectives, light and space to work with
- Anyplace a loved one looks particularly amazing
We have more photo tips and ideas from art directors and photo stylists! Check them out:
Shop Photo Cards
See allYou may also like
See more-

Halloween Your Halloween bucket list: fun, cozy and creative things to do all October long
It’s no surprise that Halloween is a favorite for many. It’s a season filled with pumpkin carving, crisp breezes and ...
-

Keepsake Ornaments Add some Halloween glee to your tree! 🎃
From sassy cats to friendly ghosts, vintage vampires to mischievous kittens, we have lots of options if you're lookin...
-

Mahogany You do it all with so much grace
I was sitting in a coffee shop the other morning, when a woman walked up to me. She looked at me and touched my arm a...
-

Halloween More than a night: The trends shaping Halloween 2026
For years, Halloween has been celebrated on a single night. But all of that’s changing. From frightfully fun activiti...
-

DaySpring God’s answers might just be hidden in the ordinary
I wasn't your average 17-year-old dreaming about weekends at the mall or sleepovers with friends. Instead, I was cons...
-

Mahogany The joy of movement
As I've gotten older, I've learned that wellness isn't just about exercise. It's about feeling good, living well and ...
-

DaySpring How to start each day feeling renewed by grace
Amid the demands of daily life, carving out time for spiritual nourishment can indeed be a challenge. However, center...
-

Keepsake Ornaments Complete your collection!
Class is in session with Defense Against the Dark Arts professor Gilderoy Lockhart™. 🪶 ✨ Complete your Harry Potter a...
-

Gifting Happee Birthdae, Harry!
Celebrate the birthday of the Boy Who Lived with this fun collection of Harry Potter gifts! From cozy blankets perfec...
-

Halloween Witchy Halloween party ideas: Fun crafts and activities for a magical night in
Witch-themed parties have always delighted Halloween fans. They offer hosts and partygoers alike the chance to intera...
-

Calendar Flip Share More Moments: December 2026 Holidays and Observances
Whichever holidays you celebrate, whatever your traditions and whoever you call family, December is a month full of m...
-

Calendar Flip Hey, Pumpkin! October 2026 Holidays and Observances
Get info, ideas and inspiration for October holidays and observances, including free sharable quotes and digital wall...
-

Calendar Flip Share joy, give thanks: November 2026 Holidays and Observances
Get info, ideas and inspiration for November holidays and observances.
-
DaySpring The secret to praying when you don't know how to pray
I open the closet door in a room that is not my own. I put packages of diapers on the top shelf, rearranging and rest...
-

Mahogany Every woman has a hair story
I always take a selfie as soon as I get in the chair at my hair appointment. Most women take photos after, but it’s t...
-

Keepsake Ornaments An epic adventure for your tree 🧙🏻♂️
Relive some of your favorite moments from The Lord of the Rings: The Fellowship of the Ring™ with this Keepsake Ornam...
-

Keepsake Ornaments What a great little tree! 🎶🎄
This little tree has a LOT going for it. And just like the one in "A Charlie Brown Christmas," this Peanuts® ShowTopp...
-

Keepsake Ornaments Childhood nostalgia incoming! 🥰
This incredible Keepsake Ornament depicting scenes from the classic poem, "A Visit from St. Nicholas," will take you ...
-

DaySpring Six Scriptures for spiritual rest this summer
A recipe for a relaxing summer afternoon: the sun’s warming rays, a cool drink, something good to read, a comfortable...
-

Keepsake Ornaments A carousel fit for a princess 👸
A Disney Princess, that is! Cinderella, Jasmine and Ariel are riding in high style on this gorgeous, gilded carousel...
