Easter basket ideas for all ages: DIY decorations, gifts and more
Excited to get hopping on those Easter baskets? We love to see it. And we love to inspire it, too! So we’ve put together a bunch of fun Easter basket ideas to help you make the most of this spring celebration.
Our DIY Easter basket ideas for every age will plus up any store-bought basket you’ve got. And of course, we have allll the gifts that will make your kids so excited to be up early on Easter morning. Except maybe your teenager. Because teenagers.
Inspired? Create and share by tagging @HallmarkStores.
Looking for Easter basket ideas and gifts that will appeal to a specific age group? Click on the links below to jump right to the section you need.
Easter basket ideas perfect for toddlers
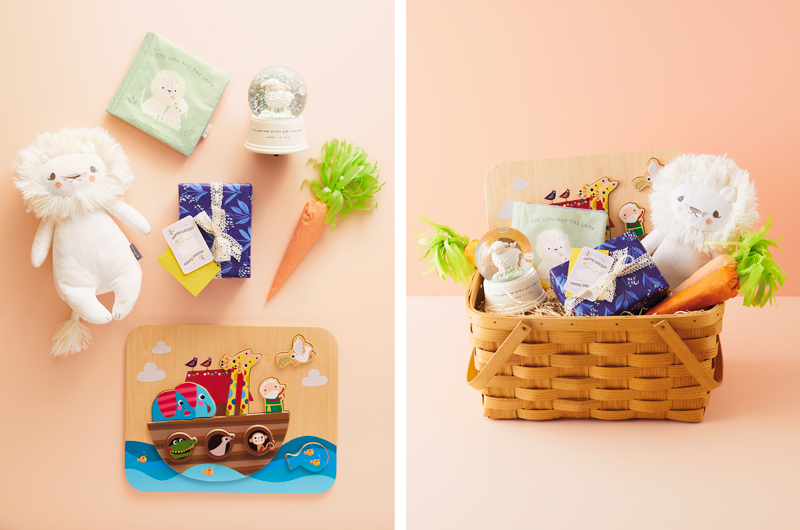
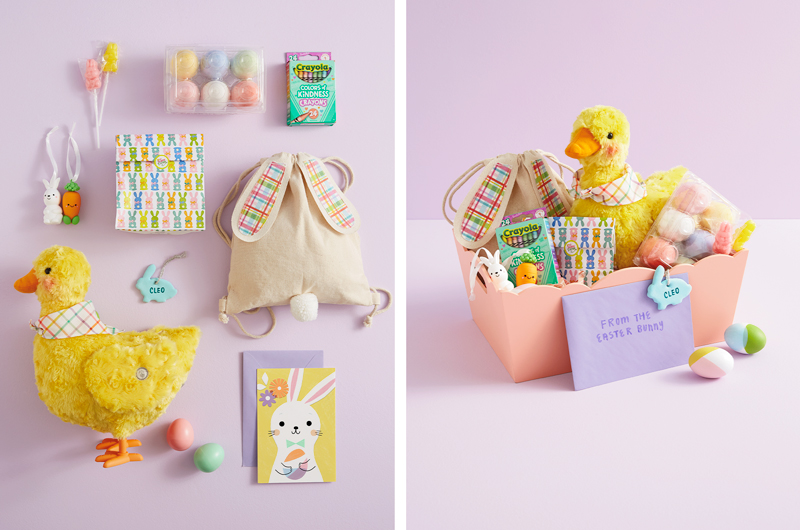
Toddlers are juuuuuust starting to get wise to all the fun Easter brings. And what better way to celebrate that fact than by surprising them with all things cute and cuddly or sweet and small?
For instance:
- This recordable lion plush. You can use it to record a special Easter message or a simple “I love you.”
- A lamb water globe. It plays a sweet little tune to send them off to sleep.
- A Noah’s Ark wooden puzzle. It’s got big chunky pieces perfect for little chubby fingers.
- The DIY carrot treat bag below. Imagine their eyes lighting up when they rip into it and their favorite snack is revealed. It’ll be the best Easter surprise ever.
- A mini card for your mini me. It just doesn’t get any cuter!
DIY Carrot Treat Bag
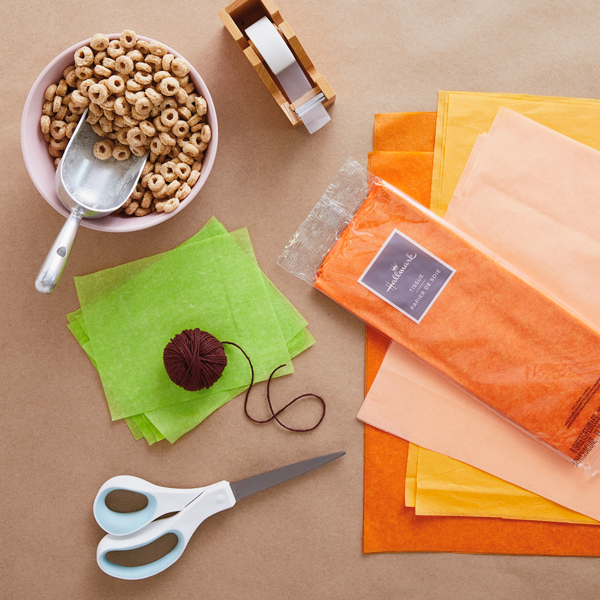
What you’ll need:
• Orange or peach-colored tissue paper
• Green tissue paper
• Twine or string
• Scissors
• Toddler-approved snack (we chose some oat-o’s)
• Tape
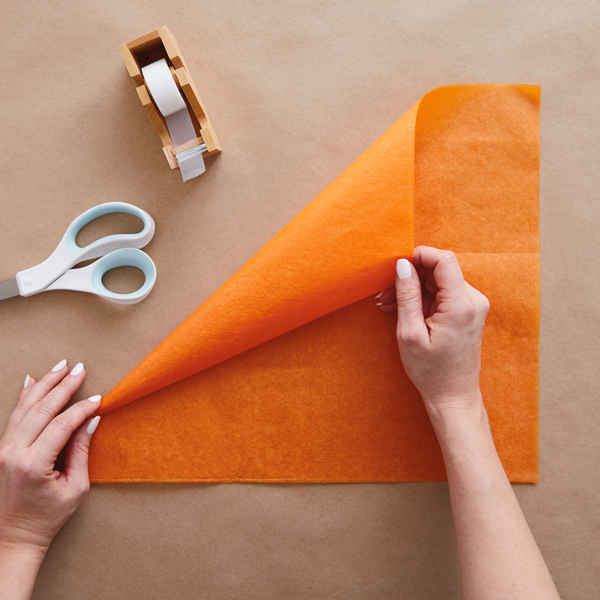
1. Start by cutting a square of tissue. Make a cone by bringing down the top left corner toward the center of the square and rolling up the tissue.
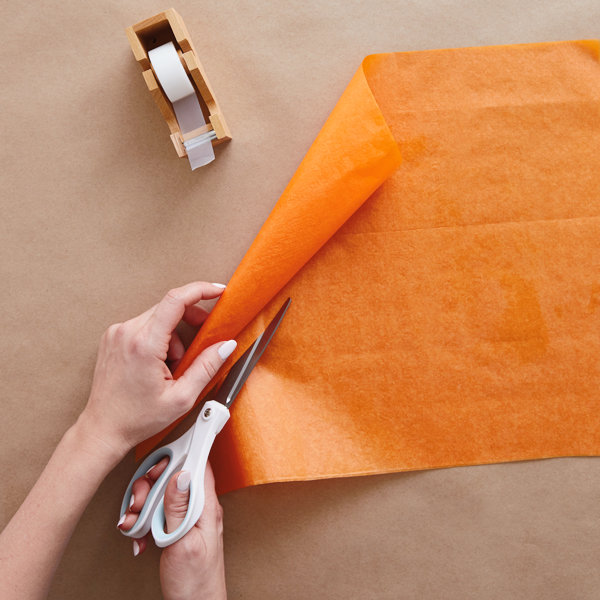
2. Cut off excess paper. Once you have a cone that’s a good size for your toddler’s Easter basket, trim off the remainder of the tissue paper.
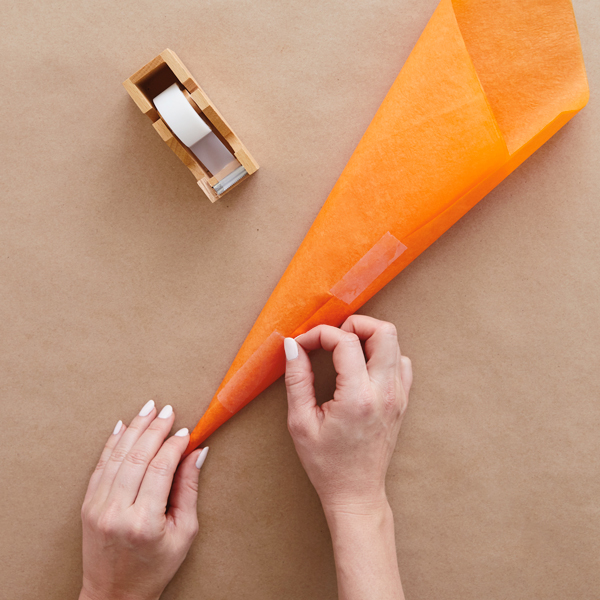
3. Tape down the bottom of the cone. Put another piece of tape wherever you feel it needs to stay secure.
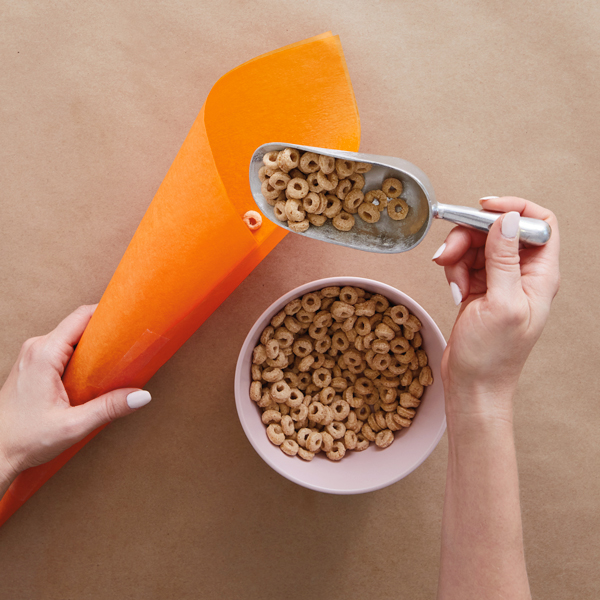
4. Pour in your toddler snack. About a half cup worked for the size of cone we created.
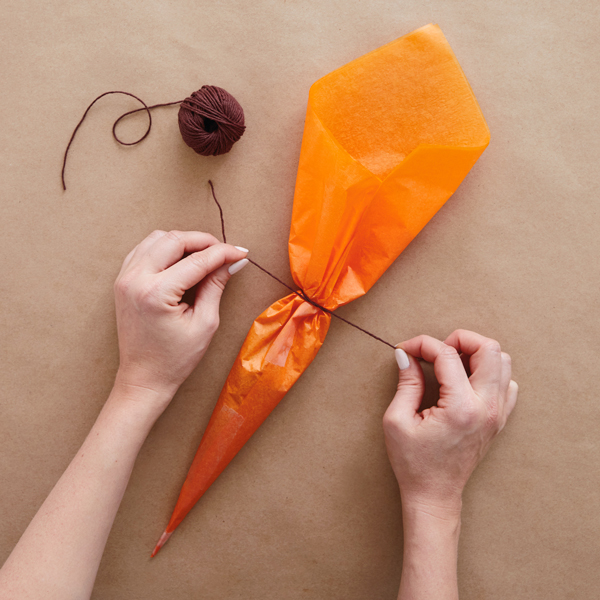
5. Tie it up. Gather the tissue paper at the top and using a piece of twine or string tie it closed really tight. Adjust the tissue or smooth it out where needed, then secure the string with a knot. Cut off the excess tissue paper above the knot, leaving about half an inch for securing the carrot top to.
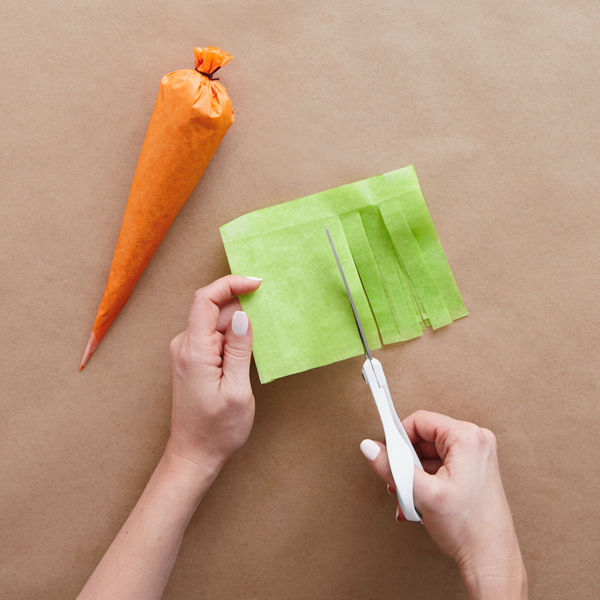
6. Make the carrot top. Stack two or three smaller squares of green tissue, and cut some fringe along one edge. Feel free to make your cuts varying thicknesses.
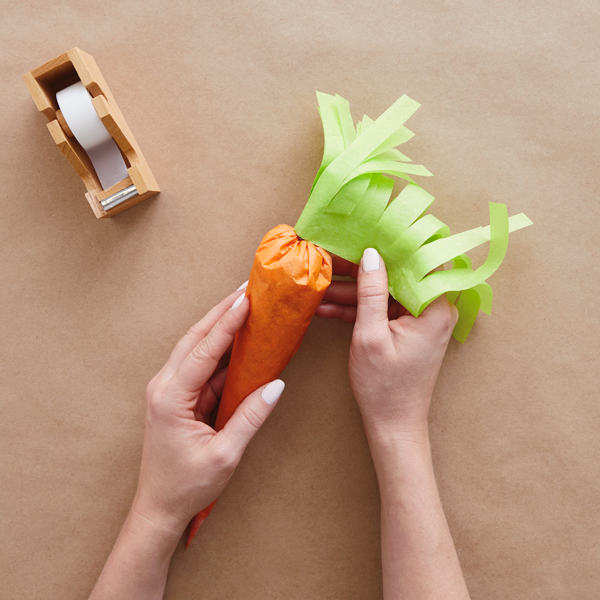
7. Add the carrot top to the carrot. Tape down one end of the non-fringed edge at the top of the carrot. Wrap it around and tape it down to finish.
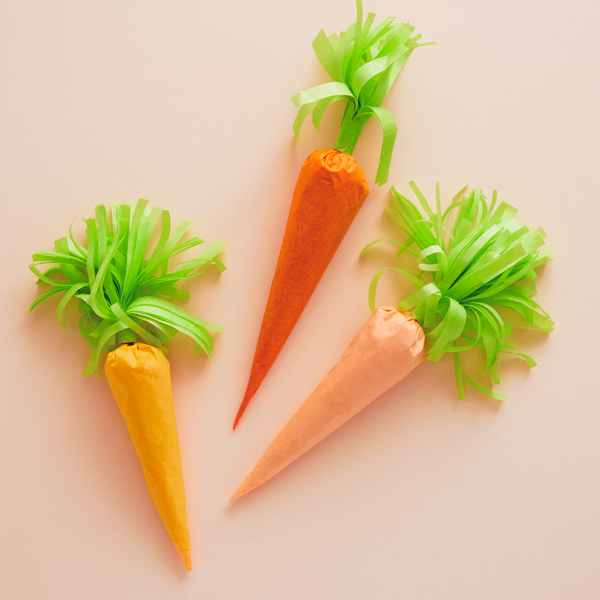
8. Pop your DIY carrot treat into the basket. They look especially cute nestled into Easter grass.
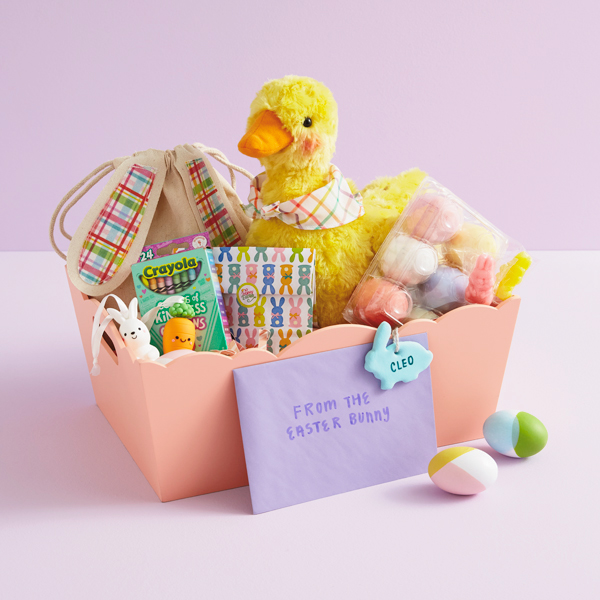
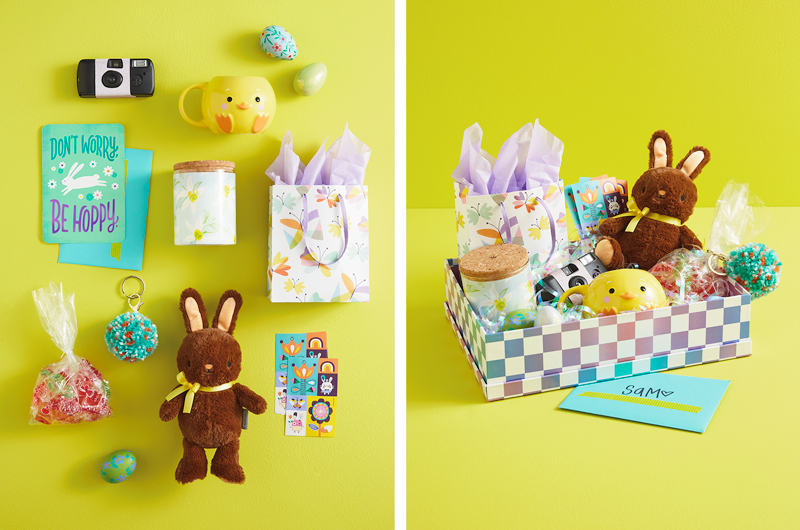
Sunny and funny Easter basket ideas for kids
Easter means spring and spring means sunshine. And to kids, sunshine means outside time. So we put together a few Easter basket ideas for kids with that in mind, along with a surprise that will really quack them up. 😂
For instance:
- This adorable Bunny and Carrot Better Together ornament set. They can go everywhere with your favorite little, from Easter egg hunts to bedtime and beyond. (And if they love these, we’ve got sooo many more.)
- Of course, Easter crayons need some free printable Easter coloring pages to go with them, right? We think so, too.
- A sweet treat or two wrapped up in some Easter gift bags with stickers. Although, if you need candy-free ideas, we’ve got them here!
- A sweet Easter card that wishes them all the Easter happiness their little heart can hold.
- One of the DIY bunny name tags shown below. It’ll help the kids remember whose basket is whose and keep the house argument-free…for at least some of the day.
DIY Personalized Bunny Tags
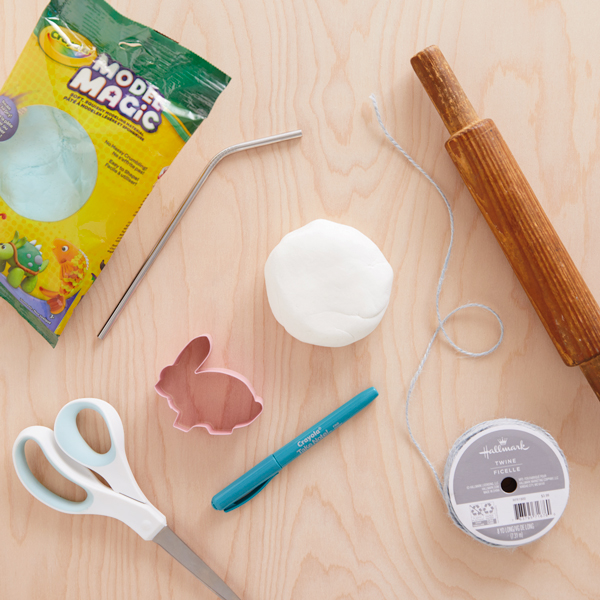
What you’ll need:
• Crayola® Model Magic
• Ribbon or twine
• Rolling pin
• Scissors
• Crayola Take Note Marker
• Bunny cookie cutter
• Metal straw or something to make a small hole

1. Roll out the modeling clay. We rolled our Model Magic to about 1/4” thick. This makes it thick enough to work as a tag but not so thick that it takes forever to dry.
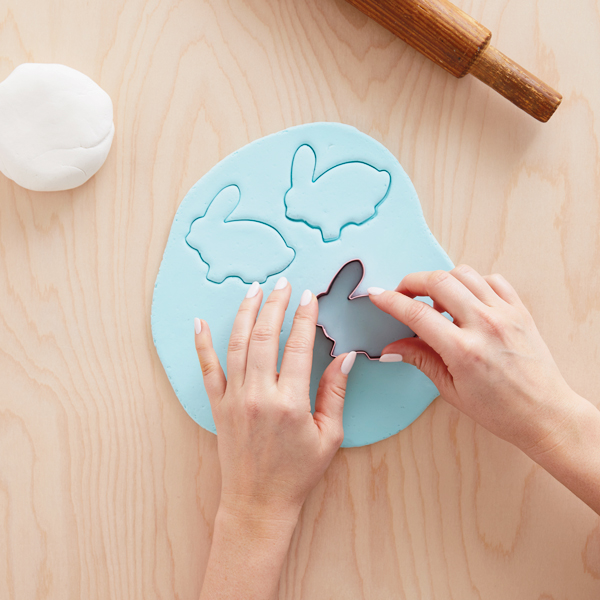
2. Cut out your bunnies. Using a cookie cutter, cut out as many bunnies as needed. These make cute place cards or food markers, too, so feel free to make extra.
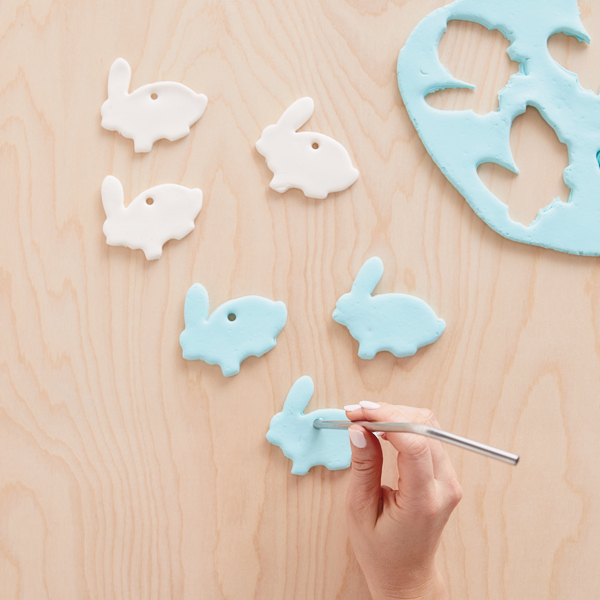
3. Punch out a small hole. Use a metal straw to make a hole to thread ribbon or string through.
4. Let the tags dry overnight. Tags should be completely dried out by morning. Placing them on a wire rack may speed up the process a bit, as it allows for more air circulation.
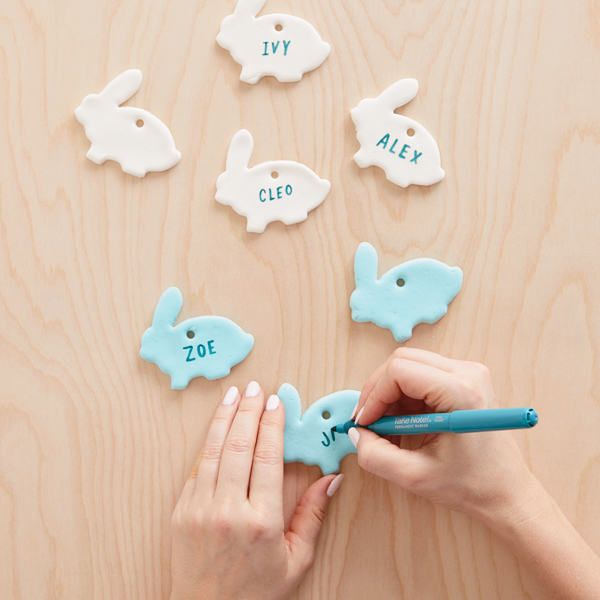
5. Add your kid’s name. Once the tags are fully dried, write the name of your child on the bunny with a permanent marker.
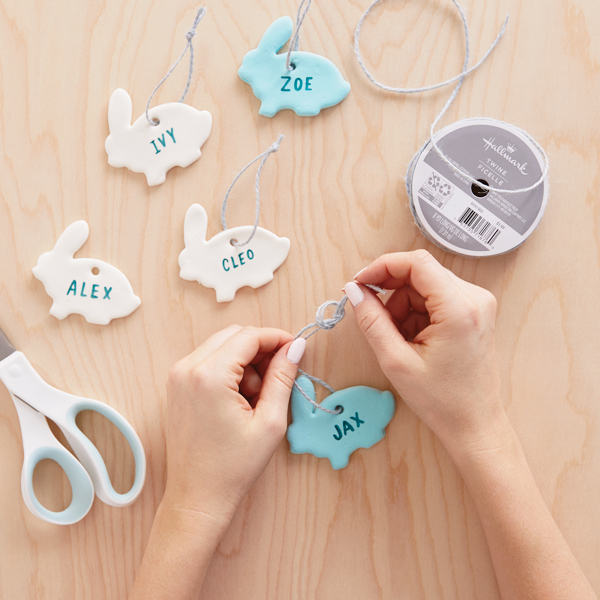
6. Add some ribbon. Thread the ribbon or twine through the hole in your dried bunny tag.
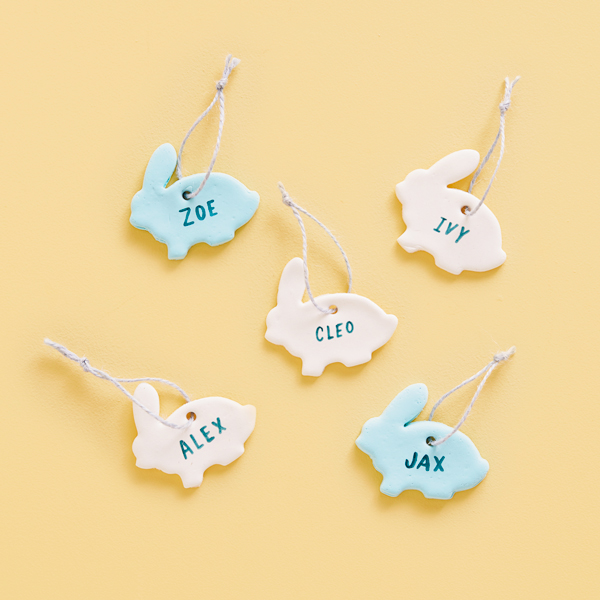
7. Tie the tag to your child’s Easter basket or gift. You can use these to keep track of whose Easter basket is whose, or use them as a gift topper.
Easter basket ideas teens will love
The average teen probably won’t admit it, but they still love waking up to an Easter basket waiting outside their door. Our gift ideas for them include things they can get excited about without feeling embarrassed.
For instance:
- A cute Easter plush. They might say they’re past the age of loving stuffies, but if it’s cute enough, somehow it escapes the label of “kid stuff.”
- A sticker set. You’re never too old for stickers.
- A disposable camera! Teens are very much digital beings, but they’re developing a love of vintage and analog items, too.
- A few of their favorite snacks or candies wrapped up in treat bags.
- The DIY pom-pom keychain below. You might be surprised at how sentimental they’ll get over something handmade. Put it in their basket and see where it ends up over time.
- A sweet-smelling candle. It’s hard to feel angsty when your room smells like soothing vanilla.
- A punny Easter card. Will they roll their eyes? Maybe. Will they know they’re loved? Definitely.
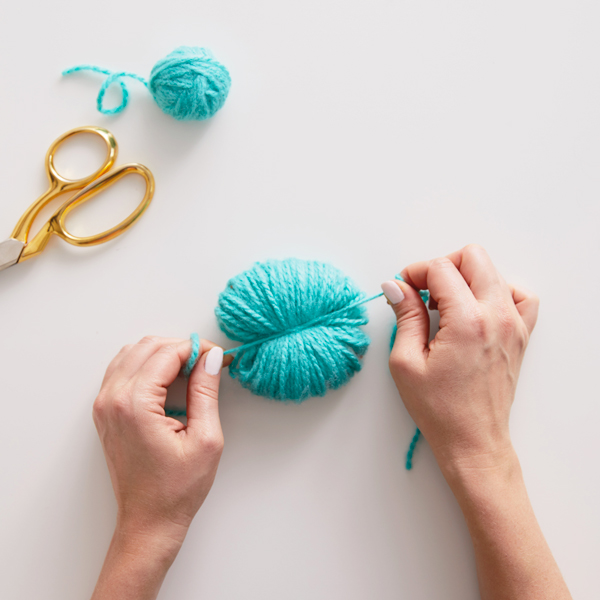
DIY Pom-Pom Keychain
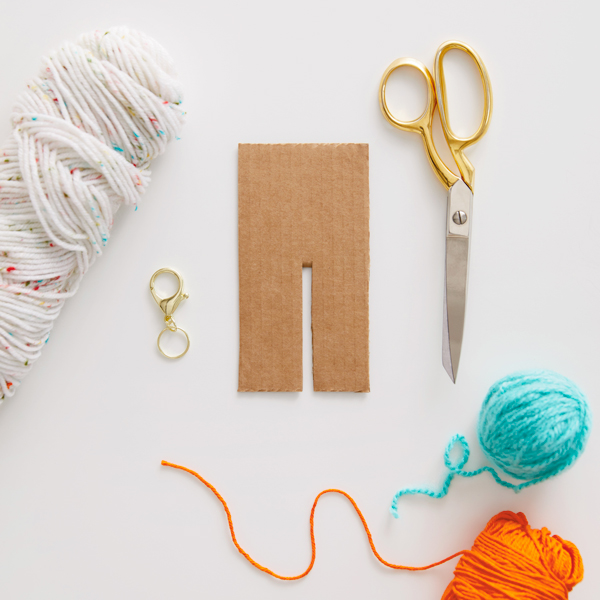
What you’ll need:
• Yarn (we used three colors and they all had different weights)
• Scissors
• Keychain
• Piece of cardboard
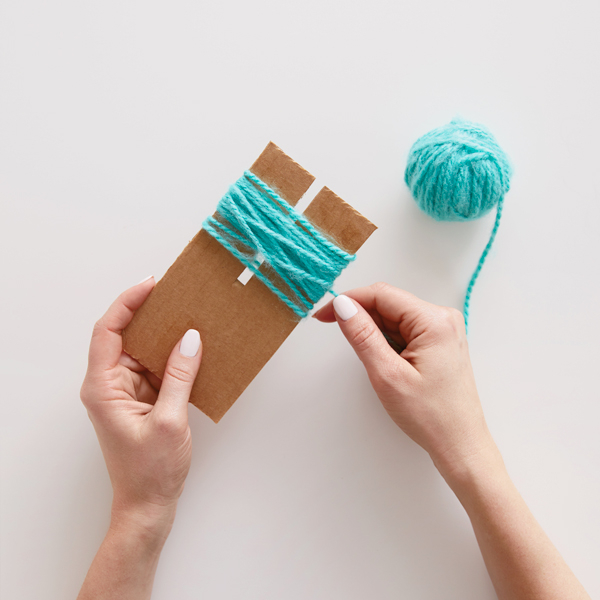
1. Make a DIY pom-pom form. To make it, cut a cardboard rectangle about 3” x 6”. Then make a slit 1/4” wide in the middle of the short end, stopping about halfway through the piece of cardboard.
2. Start wrapping. Wrap your primary color around the cardboard pom-pom form, covering the slit you made.
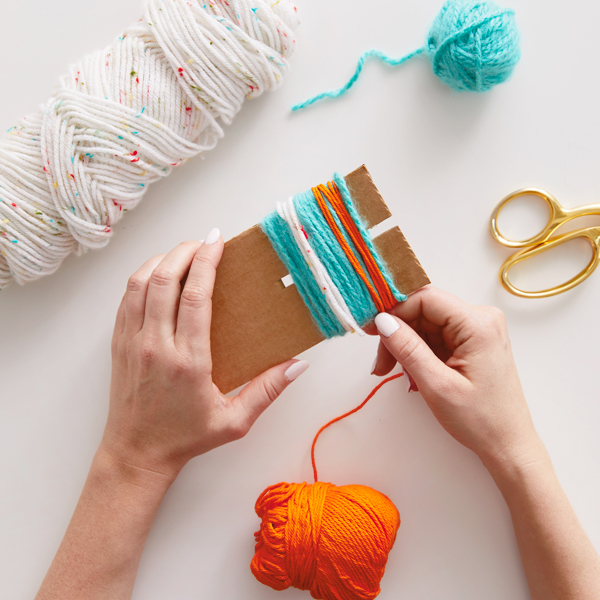
3. Switch up the colors. To make a spicy pom-pom, add more colors! No need to tie anything off—just cut off your first color and start wrapping your next. We did this pretty randomly.
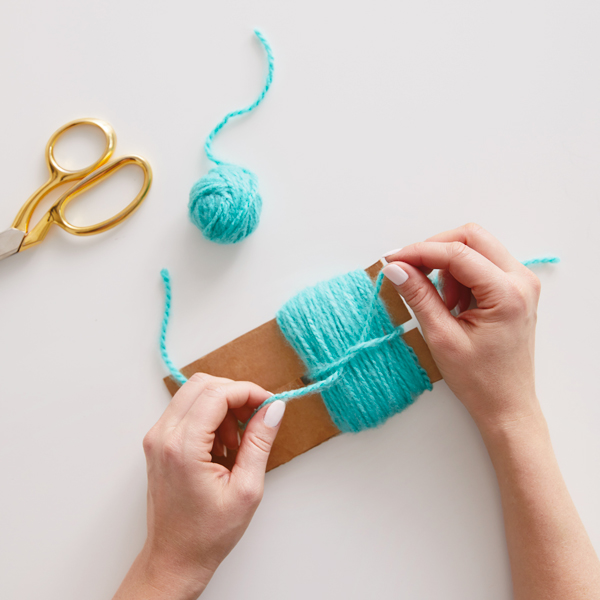
4. Tie off your pom-pom. Thread a separate piece of yarn about 12” long into the slit at the center of the cardboard form. Tie it loosely around all the yarn you’ve wrapped onto the form and make a loose knot.
5. Release the yarn. Slide all the yarn off the cardboard, then tighten and tie the knot so it’s super secure.
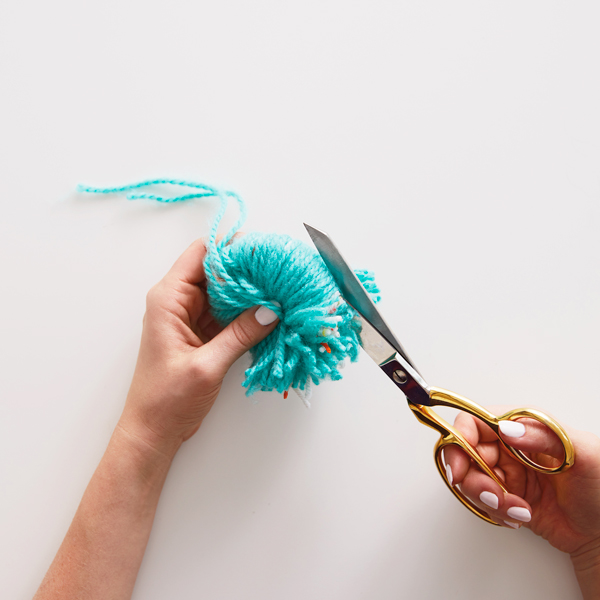
6. Cut and fluff. Use scissors to cut all the loops in the yarn, then fluff it out.
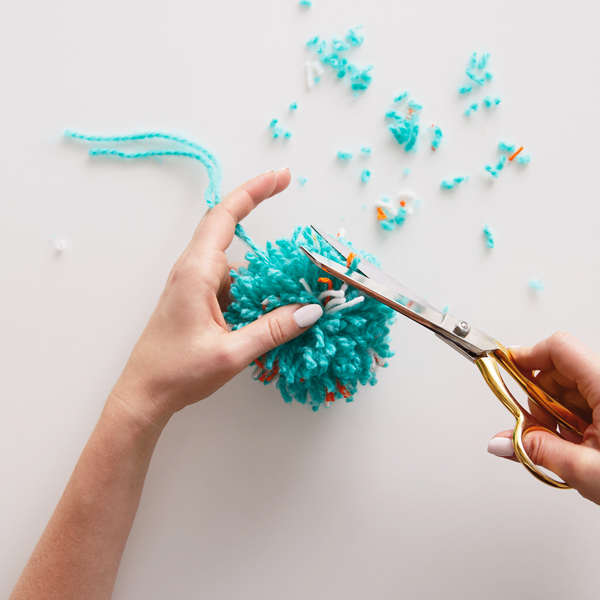
7. Shape the pom-pom. Trim the ends of the yarn so the pom-pom looks like a nice, round sphere.

8. Tie to a keychain. Using the extra length from the piece of yarn you used to tie everything together, tie your pom-pom to the keychain.
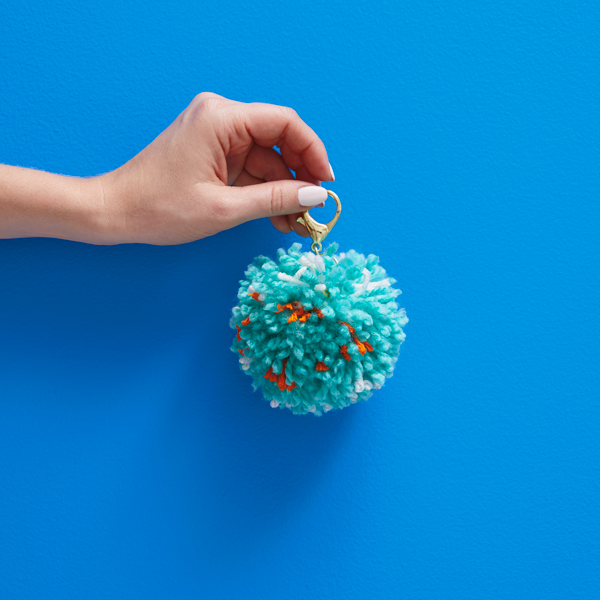
9. Attach to an Easter basket. You can tie it to the handle, or if you go the route of this adorable bunny bag, attach it to one of the handles.
Floral Easter basket ideas for the plant lover
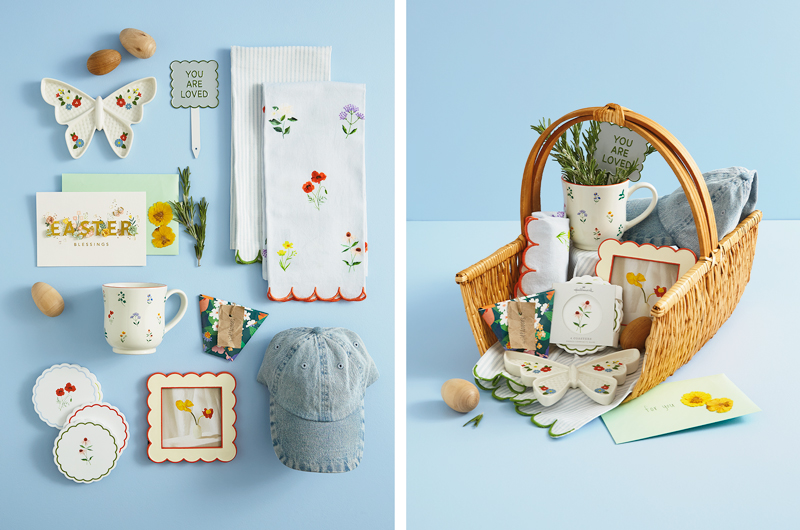
Whether they’re a hardcore vegetable gardener or a collector of houseplants (you really can’t have too many), with the right gifts, you can put together an Easter basket that’s practically bursting with spring vibes.
For instance:
- First, a floral-pattern mug to greet them with sunshiny cheer, no matter what the weather’s like outside.
- A floral tea towel set to pretty up the kitchen. We love the little scalloped edges. 🫶
- A garden stake that reminds them how much they’re loved. It’s small enough that it can go in a potted plant, too!
- A delicate little butterfly trinket dish to remind them of the beauty of the season.
- A small, scalloped photo frame. Put a favorite pic of the two of you inside!
- A new hat to keep their eyes and face shaded from the sun when they’re working or playing outside.
- A set of floral coasters to bring spring into the living room or office…and keep drink stains and mug rings away!
- A gorgeous papercraft card that fits right in with the floral theme.
- Top it off with a pretty seed packet! 🌸 Check out the easy DIY below to see how to make one out of some floral gift wrap, no tape needed!
DIY wrapping paper seed packet
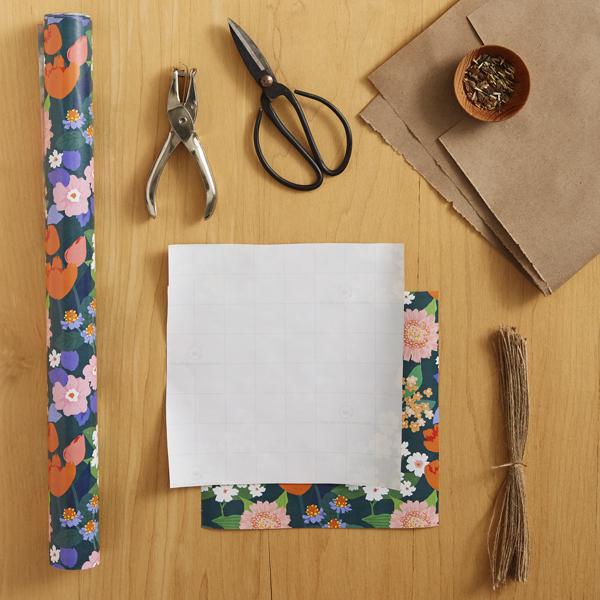
What you’ll need:
• Gift wrap (ideally some that has the grid lines on the back!)
• Scissors
• Hole punch
• Marker
• Scrap paper (for a tag)
• Ribbon
• Seeds
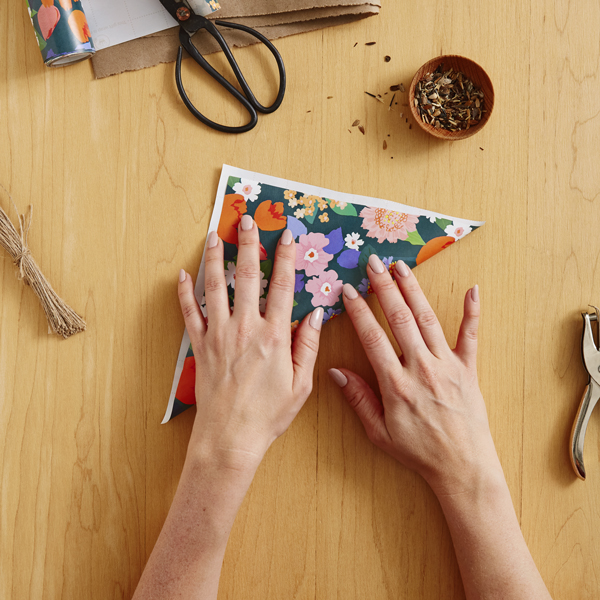
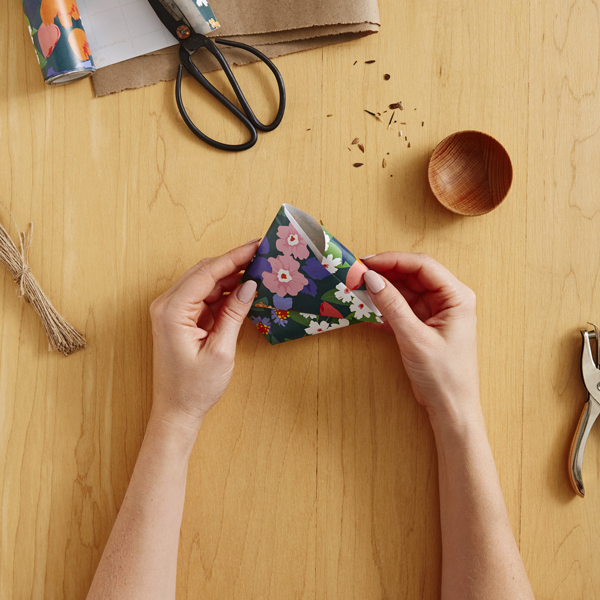
1. Cut out a perfect square of gift wrap and fold it in half diagonally to create a triangle.
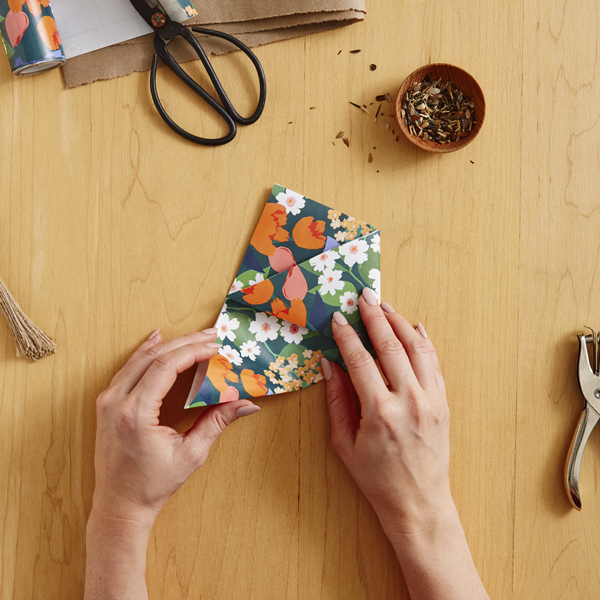
2. Turn the long edge toward you, and fold in the right corner so that it just touches the left edge. Then repeat with the left corner. The result will be a little envelope with a flat edge along the bottom and a pointed flap at the top.
3. Separate the two sides of the pointed edge at the top, revealing a tape-free pocket inside! Fold down the front flap, tuck it down into the front pocket and give it a good crease.
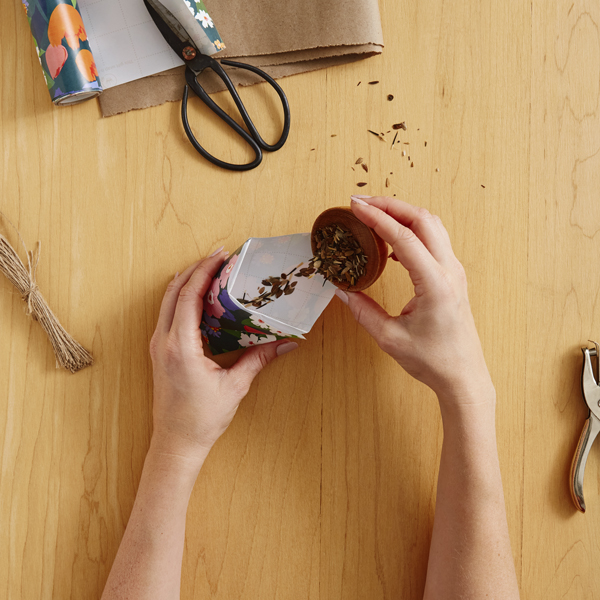
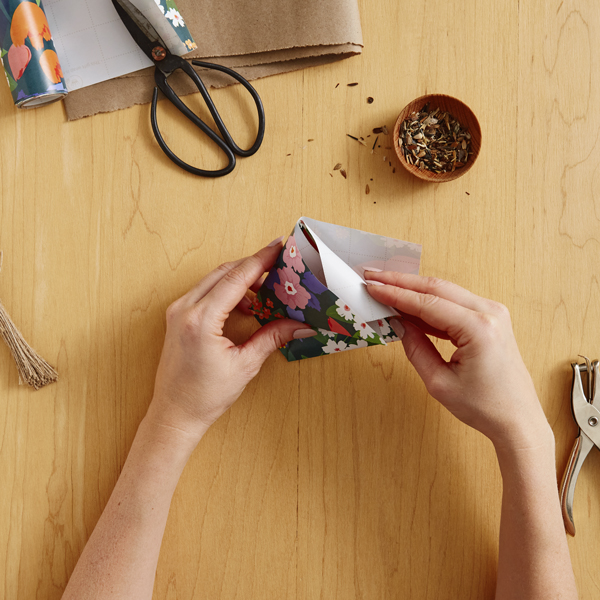
4. Fill the envelope you’ve created with seeds of your choice. They could be seeds you’ve saved from your own garden or purchased from a garden store.
5. Fold down the back flap into the front pocket to close the seed packet up.
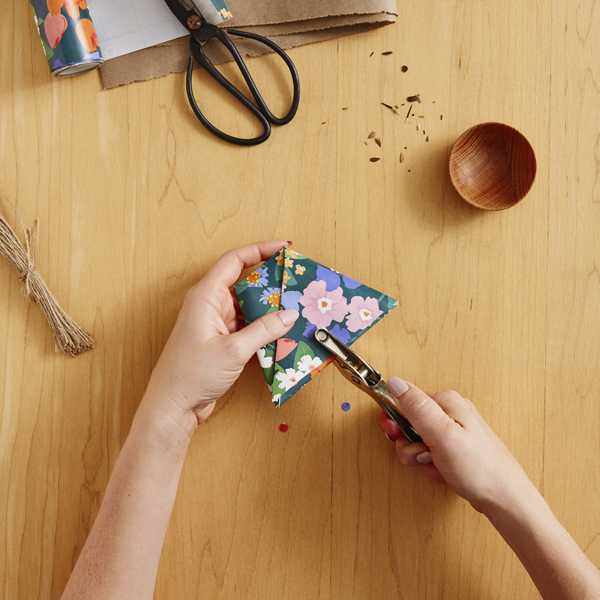
6. Punch a hole about a half inch from the top that you just folded down. On your scrap paper tag, write down what kind of seeds are inside, then punch a hole in that, too.
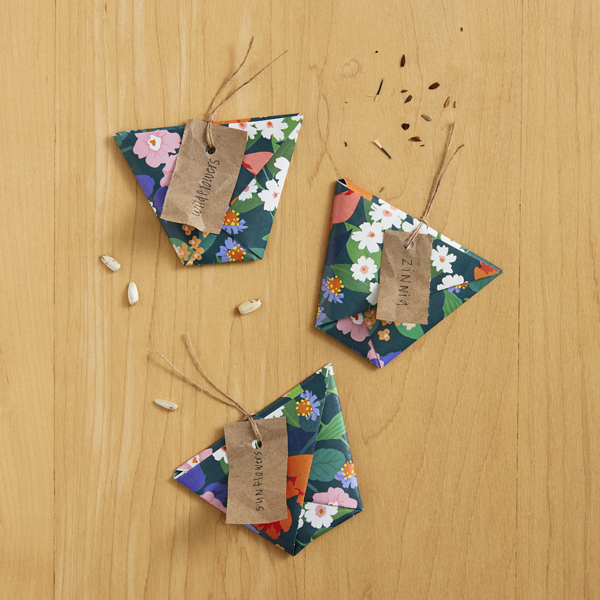
7. Thread some ribbon through the hole in the packet and the tag and tie into a knot or bow to secure. Done!
Comforting Easter basket ideas for friends or family
Easter is a time for togetherness, so homey gifts for friends or family may be on your list, too. We’ve got several ideas to fill their heart and basket with love this Easter.
For instance:
- This wooden charcuterie board. For family gatherings filled with warmth and togetherness.
- Some sweet, little serving bowls. For snacks, condiments, recipe prep or anything else their heart desires.
- And a big serving platter, too. For serving second helpings of both food and love.
- A fresh-scented candle. To lighten their heart and lift their spirits on spring days that happen to be gray and gloomy.
- A pretty pouch. So that wherever the day takes them, they’ll be reminded of the important things.
- A pop-up Easter card that doubles as springtime decor.
- A little twist with the DIY crochet lemon garland below. It’s bright and fun and oh-so-easy—the perfect finishing touch for your thoughtful basket.
DIY Crochet Lemon Garland
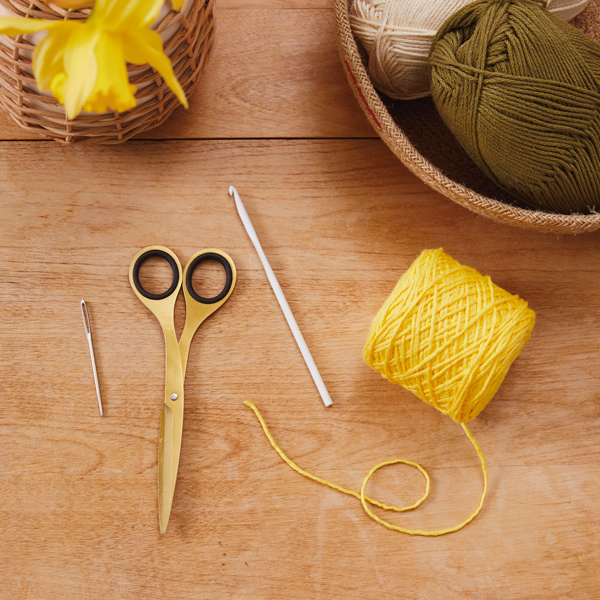
What you’ll need:
• Size 4mm/G crochet hook
• Small yarn needle
• 4 worsted weight cotton yarn in 3 colors: Yellow, green and white
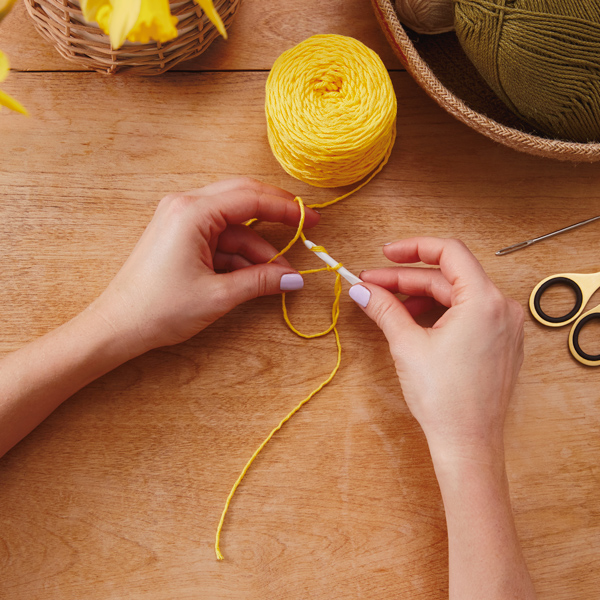
1. To start: Make a magic circle with your yellow yarn. (Not sure how to make one? A simple online search will provide lots of how-to videos!)
2. Round 1. Chain 2 (doesn’t count as a stitch), 12 double crochet into the magic circle. Untwist the yarn tail and pull the circle tightly closed. Join the circle with a slip stitch in top of the first double crochet (12 stiches).

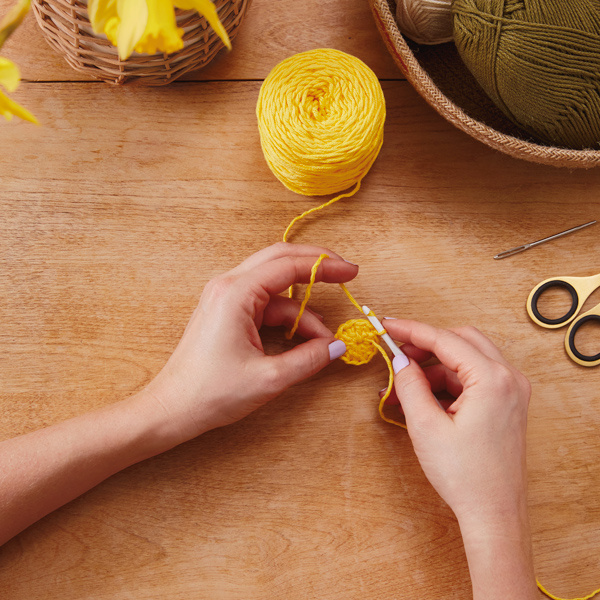
3. Round 2. Chain 2, 2 double crochet in each stitch around. Slip stitch into the first stitch to join the round (24 stiches).
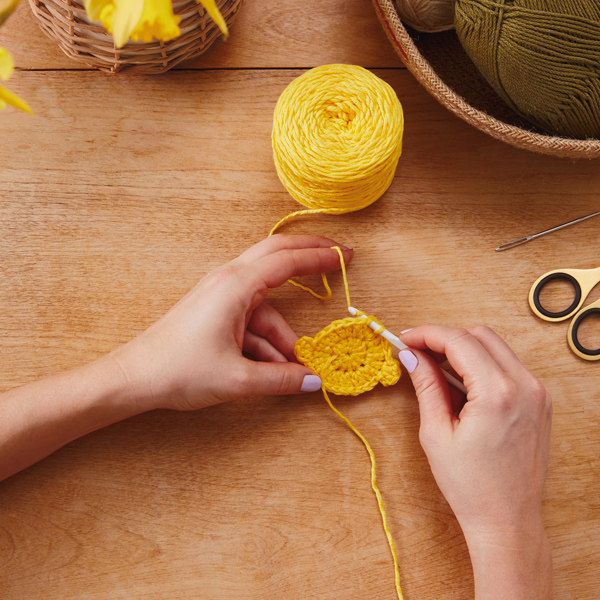
4. Round 3. Chain 2, [double crochet 2, single crochet stitch 1] in first stitch, slip stitch in each of the next 12 stitches, chain 1, [double crochet 2, single crochet stitch 1] in the next stitch, slip stitch in each of the last 10 stiches, then slip stitch in top to first chain (30 stitches).
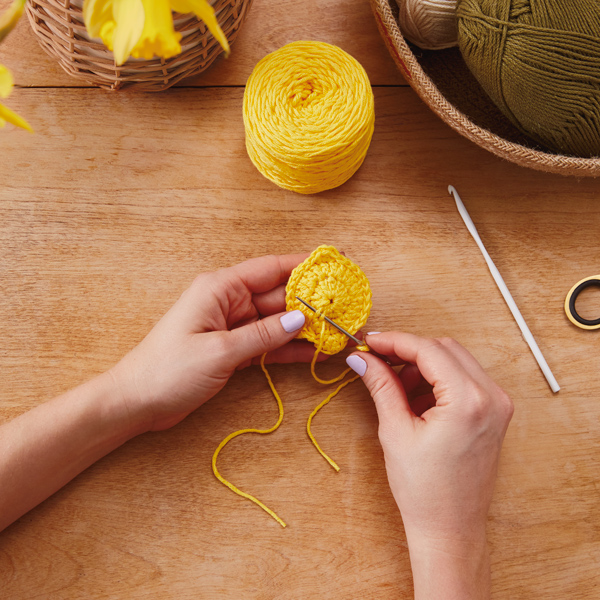
5. Weave off ends with the yarn needle and trim. Then make four more lemons so you have five lemons total.
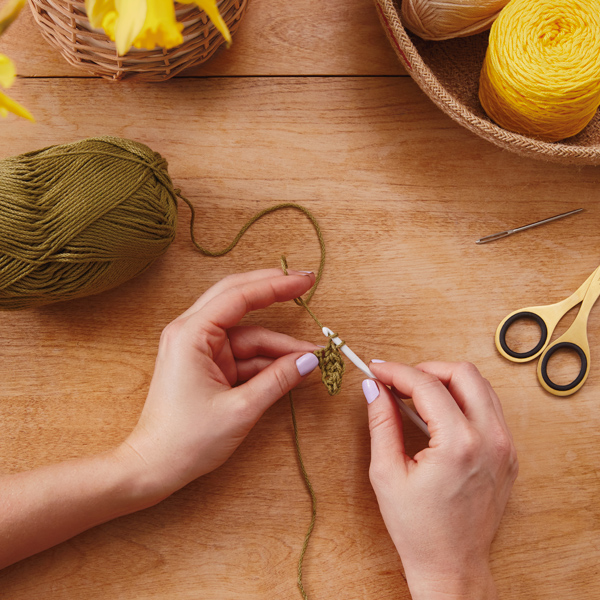
6. Make the leaf: With green yarn, slip knot onto your hook.
Round 1: Chain 6, slip stitch in 2nd chain from the hook, 1 half double crochet in next stitch, 1 double crochet in next, 1 half double crochet in next, 1 single crochet stitch in the next, turn and chain 1.
Round 2: Continue working on opposite side of the chain—1 single crochet stitch in the first chain, 1 half double crochet in the next, 1 double crochet in each of the next, 1 half double crochet in each of the next, 1 single crochet stich in the last, chain 1 and join to the first slip stitch from the top side. Weave off end towards beginning thread with your yarn needle. Fasten off, leaving a long tail to attach the leaf to the lemon.
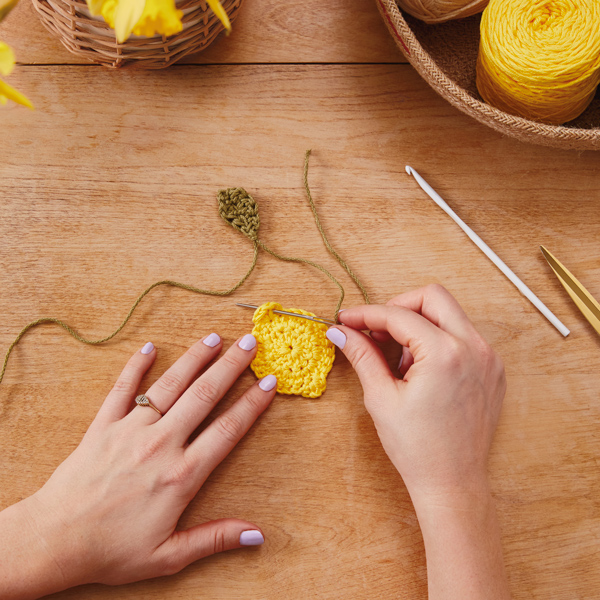
7. Sew the leaf ends through top stitches on the end of the lemons. Tie off on the back side of the lemon. We varied our leaves in directions and locations to give each lemon a different character.
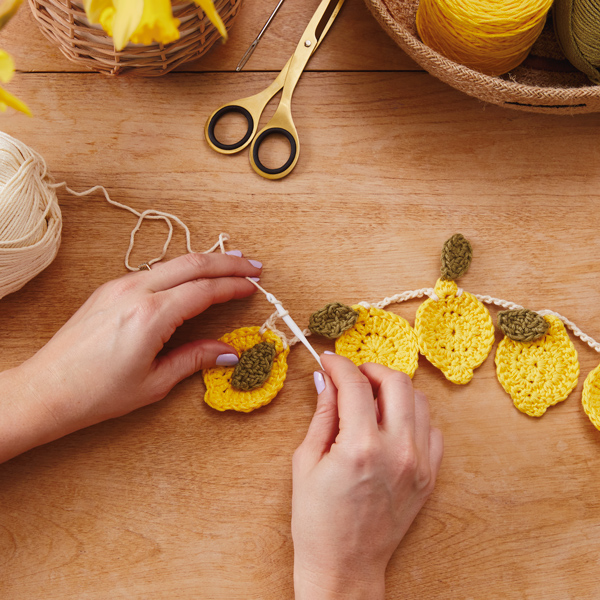
8. To create the garland, start with the white yarn. Slip knot to begin, then chain 20 (you might need more depending on how much room you need to hang the garland). When attaching the lemons to the garland chain, single crochet into a stitch at the top right of the lemon, chain 1, then single crochet into another stitch at the top of the left side of the same lemon. Chain 10 then attach your next lemon.
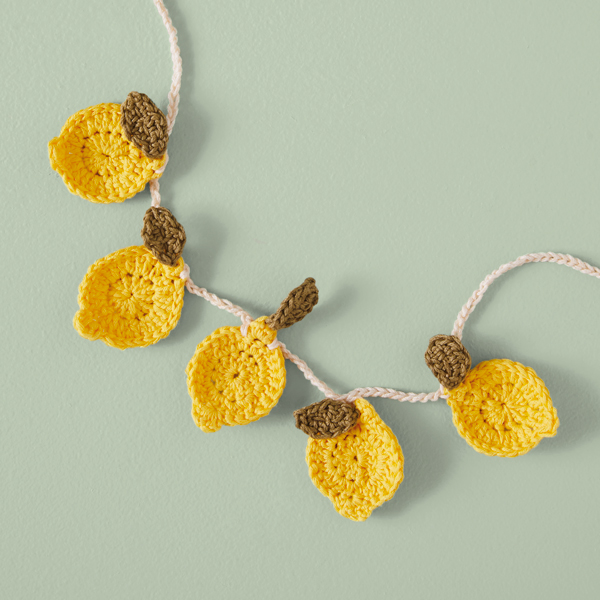
9. Repeat until all lemons are joined to the garland chain. Chain 20 and tie off. Now you have a finished crocheted lemon garland!
We hope these Easter basket ideas have you feeling a little better prepared to shower the important people in your life with love this Easter, no matter how old they are.
Of course, we’re here with more ideas if you need them. Here are some of our favorites:
Shop Easter
See allYou may also like
See more-

Christmas Stocking stuffer ideas for literally everyone on your list
The stocking stuffer struggle is real. By the time you’ve bought your main presents, you feel like you’re all out of ...
-
Halloween Halloween boo bag ideas for your entire boo crew
Costumes, candy and treats? Must be Halloween time! And whether you look forward to the door-to-door of it all, love ...
-
Mother's Day The mother lode of Mother’s Day gift ideas
It’s only natural to want to give the right gift to show the moms in your life how much they mean to you on Mother’s ...
-
Christmas 100+ inexpensive Christmas gift ideas
I was a Christmas-gift-giving cautionary tale. It was the last day I could hand off a gift in time for the holiday. I...
-
Christmas Christmas care package ideas to make a present personal
We all know someone who could use a little extra care at Christmas: maybe it’s a friend going through a tough time or...
-
Christmas 50+ Christmas gift ideas for friends
I’m known for quite a few things in my friend group, including random outbursts, spontaneous solo karaoke sessions an...
-
Card Ideas What to write: 238 short, sweet and funny gift card message ideas
From groceries to spa days and “just because” to birthdays, here are dozens of gift card message ideas to accompany y...
-
Gifting 25+ “just because” gift ideas to show you care
I love giving gifts, and it’s easy to do it on birthdays and holidays. But when I really want to flex my gift-giving ...
-
Anniversary 25th wedding anniversary gift ideas
Traditional: Silver Modern: Silver
-
Christmas Family gift exchange ideas to express your creativity
We’ve got family gift exchange ideas to make gifting fun and easy.
-
Sympathy Sympathy gift ideas for offering your condolences and support
Many times, we don’t know what to say after a loss. It can be difficult to determine what will comfort a hurting frie...
-
Gifting Grandparent gift ideas they’ll love and remember
Here are some tips and suggestions for grandparent gifts—what you can give to the persons who give so much to us.
-
Card Ideas 17 ways to personalize a card with tuck-in gifts
It’s no surprise we think cards are a wonderful way to support and celebrate each other. Getting a card in the mai...
-
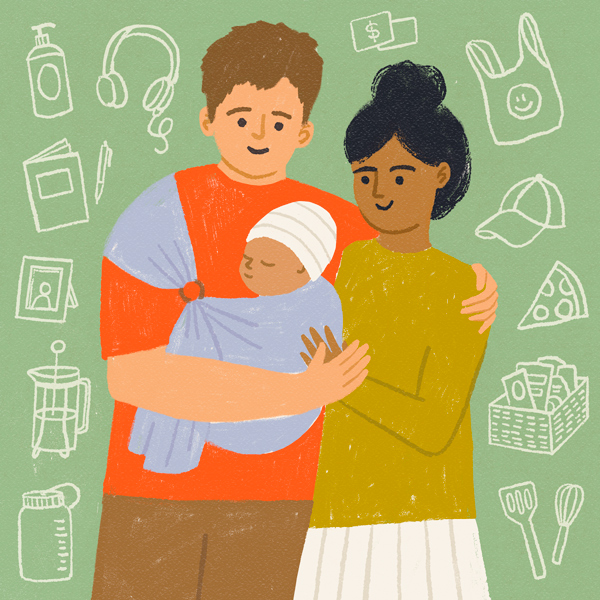
Baby Gifts for new parents: Thoughtful things to give and do
We know what to get for babies: onesies and blankies and binkies. But what about the newly overwhelmed moms and dads?...
-
Gifting 15+ creative ways to gift mugs
I think lots of things are underrated, like mint chocolate chip ice cream (which does NOT taste like toothpaste, FYI!...
-
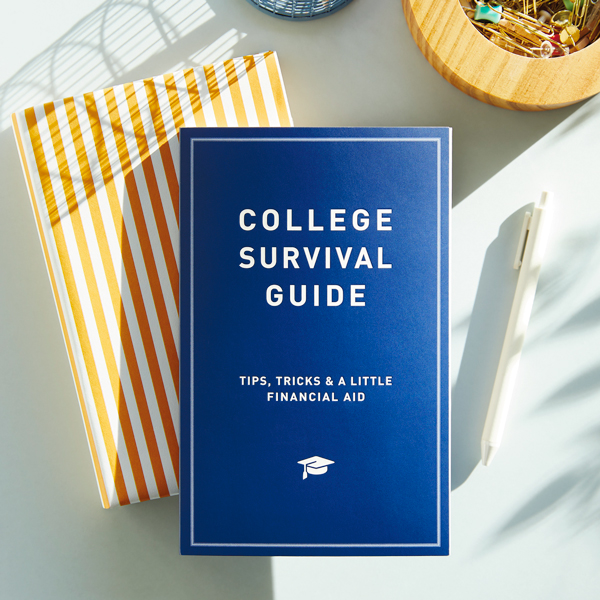
Graduation The College Survival Guide: Make the perfect graduation gift even better
The College Survival Guide was created to turn the most-requested high school graduation present (money) into a de...
-
Birthday 25+ ideas for creative, personal birthday care packages
When a friend’s birthday rolls around and you can’t be together to celebrate, the next best thing is to bring the cel...
-
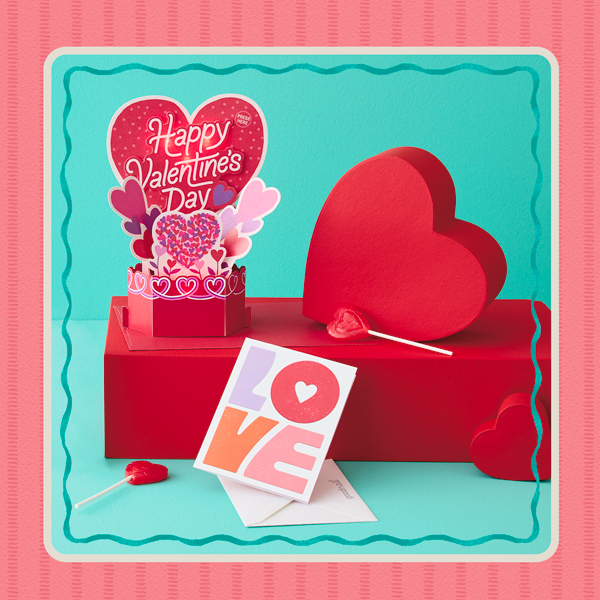
Valentine's Day 200+ Valentine’s Day gift ideas for everyone in your heart
In junior high, I made a giant Valentine’s Day collage for my first girlfriend. She loved it. Was it amazing or dorky...
-
Christmas 30+ Secret Santa gift ideas for when you don’t know what to get them
It’s that time of year again—you’ve been cajoled into at least one Secret Santa gift exchange. If you’ve done this be...
-
Anniversary 50th wedding anniversary gift ideas
Traditional: Gold Modern: Gold


![Number 25 with symbols for silver [Anniversary Gifts by Year]](https://ideas.hallmark.com/wp-content/uploads/2021/07/25-anniv-ideas.jpg)


![Number 50 with symbols for gold [Anniversary Gifts by Year]](https://ideas.hallmark.com/wp-content/uploads/2021/07/50-anniv-ideas.jpg)
